
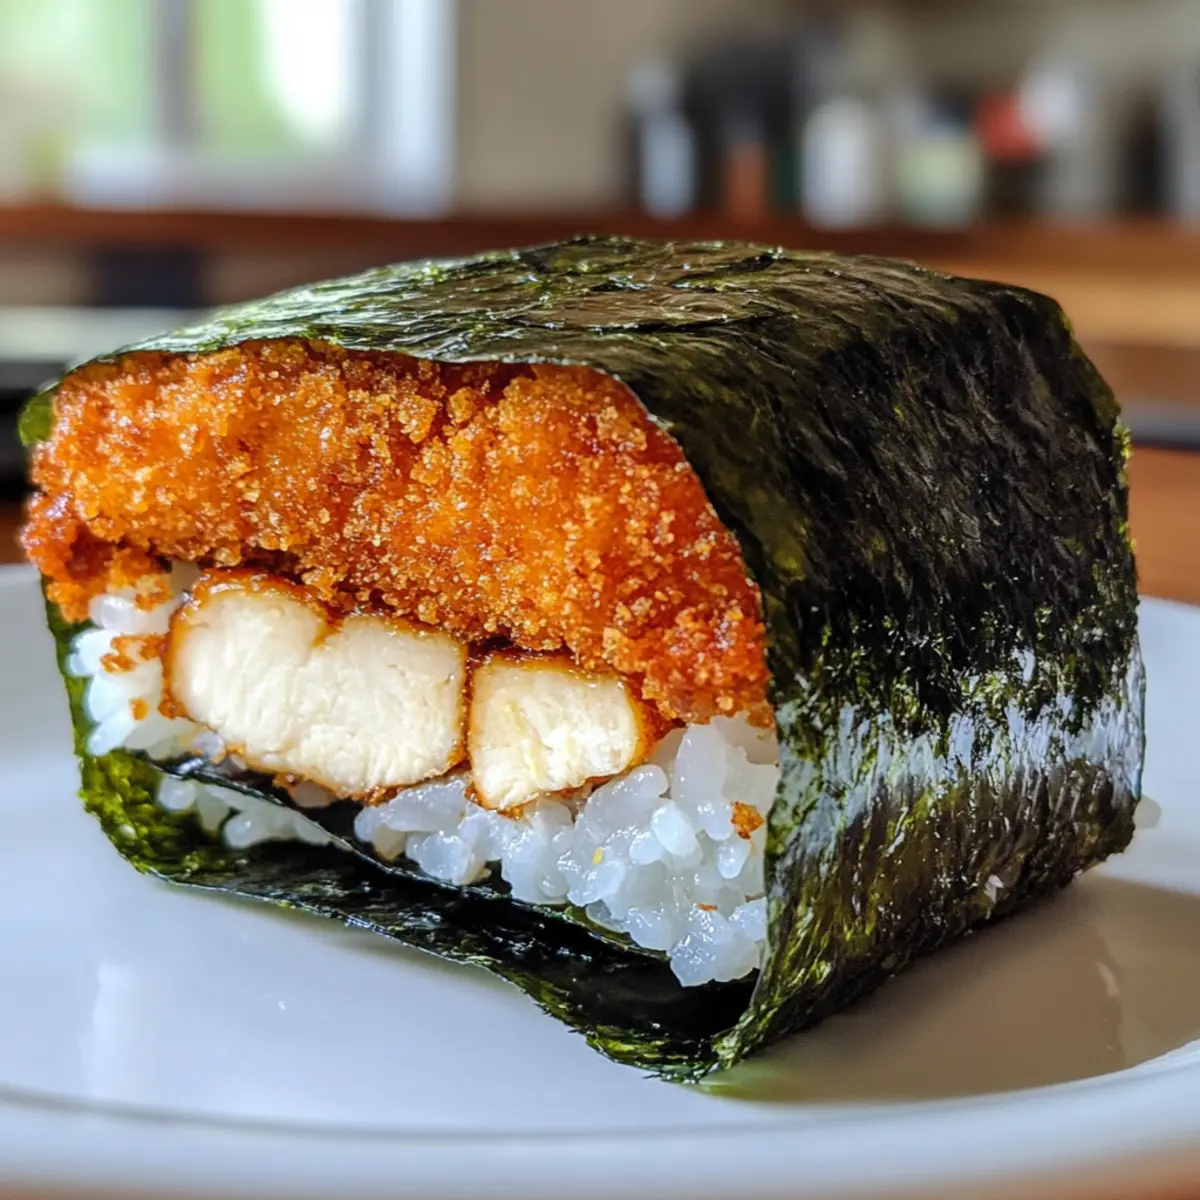
As I stood in my kitchen, the sizzle of oil ignited my senses, transporting me to a bustling street market in Japan. That’s when I decided to craft a delightful twist on a traditional favorite: Chicken Katsu Musubi. This recipe seamlessly blends crispy fried chicken with fluffy sushi rice, all wrapped in savory nori, offering a satisfying bite that’s as fun to make as it is to eat. The best part? You can whip up this delicious dish in less than an hour, making it perfect for a quick lunch or a mouthwatering snack anytime. It’s a fresh and flavorful departure from the usual Spam musubi, ensuring each bite is packed with juicy, crunchy goodness. Are you curious about how to bring this scrumptious culinary creation to life?
Why is Chicken Katsu Musubi a Must-Try?
Crispy Delight: The unique combination of crispy fried chicken and seasoned sushi rice creates an irresistible contrast in each bite.
Quick and Easy: This delightful dish comes together in less than an hour, making it a perfect solution for your lunch or snack cravings.
Flavorful Twist: A delicious alternative to traditional Spam musubi, it infuses savory flavors that will satisfy your taste buds.
Versatile Options: You can easily adapt the recipe—try pork katsu or even tofu to cater to different diets!
Fun to Make: Involve the whole family in the preparation. Wrapping musubi is a great activity, and it’s sure to be a crowd-pleaser!
Perfect Pairing: Serve alongside some pickled ginger or a light salad for a balanced meal that’s both nutritious and delicious. Add a touch of excitement to your lunch with Chicken Katsu Musubi, a fusion treat you won’t forget!
Chicken Katsu Musubi Ingredients
For the Chicken Katsu
• Boneless Skinless Chicken Thighs – The flavorful main protein; for a leaner option, feel free to substitute with chicken breast.
• Large Eggs – They bind the flour mixture for the katsu batter; consider flaxseed mixed with water as an egg substitute.
• All-Purpose Flour – This coats the chicken before frying; gluten-free flour works wonders as an alternative.
• Salt – Enhances the overall flavor; using kosher salt can add a delightful texture.
• Ground Black Pepper – Adds a hint of spice; feel free to skip if you prefer a milder taste.
• Panko Breadcrumbs – Essential for that signature crunchy texture; whole wheat panko is a wonderful healthier swap.
• Neutral Oil (for frying) – Perfect for frying the chicken; canola or vegetable oil is ideal for achieving that golden crisp.
For the Musubi
• Nori Sheets (cut into thirds) – Wraps around the musubi and offers an umami punch; use fresh sheets to avoid chewiness.
• Cooked Sushi Rice – Serves as the base for delicious musubi; instant rice can be a quick substitute but may change the texture.
• Tonkatsu Sauce – Provides a savory-sweet flavor; for a twist, try substituting it with BBQ sauce for a different profile.
Step‑by‑Step Instructions for Chicken Katsu Musubi
Step 1: Prepare the Chicken
Start by pounding boneless skinless chicken thighs to a uniform ½-inch thickness using a meat mallet. This ensures even cooking and tenderness. Once finished, set the chicken aside while you prepare the batter and breading.
Step 2: Make the Katsu Breading
In a shallow dish, combine large eggs, all-purpose flour, salt, and ground black pepper to create a loose batter. Whisk until smooth. This mixture will coat the chicken, giving it that famous Katsu flavor and texture.
Step 3: Coat the Chicken
Dredge each pounded chicken thigh in the egg batter until fully covered, then transfer it to a plate with panko breadcrumbs. Press firmly into the crumbs to ensure a thick, crunchy coating. This layering is essential for that delightful crispiness we’re aiming for in your Chicken Katsu Musubi.
Step 4: Fry the Chicken
Heat a neutral oil in a large skillet over medium-high heat, bringing it to approximately 350°F. Carefully place the coated chicken thighs into the hot oil, frying for about 4-6 minutes per side. Look for a golden-brown color and ensure the internal temperature reaches 165°F for perfectly cooked chicken. Once done, cool the chicken on a wire rack.
Step 5: Prepare the Sushi Rice
While the chicken is cooling, take your cooked sushi rice and fluff it gently with a rice paddle. This helps to release excess moisture and makes the rice easier to mold. If you haven’t done so already, prepare your nori sheets by cutting them into thirds, ready for wrapping.
Step 6: Assemble the Musubi
To form the musubi, lay a nori sheet flat on a clean surface. Moisten your musubi mold or a cleaned Spam can for easy assembly. Pack approximately ½ cup of sushi rice into the mold, pressing it firmly to create a compact base. Carefully remove the mold.
Step 7: Add the Chicken and Sauce
Spread a generous layer of tonkatsu sauce over the rice, enhancing the flavors of your Chicken Katsu Musubi. Place a piece of the crispy fried chicken on top, ensuring it fits snugly within the rice. This step adds that signature touch, blending textures and tastes beautifully.
Step 8: Wrap and Seal
Finally, wrap the nori around the rice and chicken combination, ensuring the edges overlap slightly. Use a bit of water on your fingers to seal the edges, preventing the musubi from falling apart. Repeat the process for any additional musubi, creating lovely, portable snacks perfect for any occasion.
How to Store and Freeze Chicken Katsu Musubi
Fridge: Keep leftover Chicken Katsu Musubi in an airtight container for up to 1 day. The rice may lose some texture, but the flavors will still be delightful!
Freezer: For longer storage, wrap individual musubi tightly in plastic wrap and place them in a freezer-safe bag. They’re good for up to 1 month.
Reheating: To retain crispiness, reheat Chicken Katsu Musubi in the oven at 350°F for about 10-15 minutes. This will help revive the tasty crunch of the katsu.
Best Enjoyed Fresh: While you can store this treat, Chicken Katsu Musubi is best enjoyed fresh to savor the perfect balance of flavors and textures!
What to Serve with Chicken Katsu Musubi
Enhance your Chicken Katsu Musubi experience with these delightful pairings that elevate your meal to new heights.
-
Pickled Ginger: A refreshing palate cleanser that brightens up each bite, balancing the rich flavors of the musubi.
-
Sesame Cucumber Salad: Crunchy, cool, and slightly tangy, it adds a crisp texture that complements the savory chicken wonderfully.
-
Miso Soup: This warm and nourishing soup brings umami depth to your meal, making it a comforting companion to your musubi.
-
Edamame: Lightly salted and bursting with protein, these tender young soybeans add a fun, interactive element to your lunch.
-
Sushi Rolls: For a fuller spread, pair with simple sushi rolls filled with avocado or cucumber for a touch of freshness.
-
Green Tea: A warm cup of green tea can enhance the meal with its earthy flavor, making each bite of musubi even more satisfying.
-
Fruit Salad: A light and fruity side providing natural sweetness, this refreshing salad balances out the savory richness of the musubi beautifully.
-
Chilled Sake: For a special touch, enjoy a glass of chilled sake—its smoothness perfectly complements the crispy textures of your Chicken Katsu Musubi.
Make Ahead Options
Preparing Chicken Katsu Musubi in advance is a fantastic way to save time during your busy week! You can cook the chicken katsu up to 24 hours ahead by frying it, letting it cool, and then storing it in the refrigerator. Additionally, you can prepare your sushi rice the day before, as it keeps well when properly sealed in an airtight container. When you’re ready to serve, simply reheat the chicken in the oven for best results, ensuring it stays crispy. Assemble the musubi just before eating by placing the chicken on the rice, applying the tonkatsu sauce, and wrapping it in nori for that perfect, fresh feel. This way, your Chicken Katsu Musubi remains just as delicious and satisfying while giving you the ease of a quick meal!
Chicken Katsu Musubi Variations
Feel free to get creative and make this recipe your own with these delightful twists!
-
Pork Katsu: Swap out chicken for thinly sliced pork for a different flavor profile. The juicy pork will provide a delicious alternative that still hits the spot.
-
Tofu Option: For a vegetarian take, use firm tofu instead of chicken. Simply press the tofu to remove moisture, then bread and fry as you would the chicken for a tasty vegan treat.
-
Spicy Addition: Drizzle a bit of sriracha on the prepared musubi before wrapping it up for an extra kick. The heat mingles beautifully with the rich katsu sauce.
-
Vegetable Medley: Add thin strips of cucumber or avocado into the musubi for fresh crunch and creamy texture. This not only elevates the flavor but also adds a nutritious element!
-
Different Sauces: Experiment with eel sauce or a teriyaki glaze instead of tonkatsu sauce to change up the taste. Each sauce brings its unique sweetness and depth to the dish.
-
Coconut Rice: For a tropical twist, consider using coconut jasmine rice instead of the typical sushi rice. The subtle sweetness from the coconut adds a lovely layer of flavor.
-
Herb-Infused Rice: Mix some chopped green onions or cilantro into your sushi rice before packing it into the mold. They’ll bring a fresh burst of flavor that complements the katsu perfectly.
If you love the idea of versatile and delicious meals, check out my Chicken Bacon Ranch or give these amazing variations to your favorite Savory Chicken Wraps a try!
Expert Tips for Chicken Katsu Musubi
• Oil Temperature: Ensure the oil is perfectly heated to 350°F before frying. This helps achieve the ideal crispiness for your Chicken Katsu Musubi.
• Avoid Overcrowding: Don’t overcrowd the pan while frying; this can reduce oil temperature and lead to soggy chicken. Fry in batches if necessary.
• Use a Thermometer: To guarantee safety and perfect doneness, use a meat thermometer to check that the chicken’s internal temperature reaches 165°F.
• Fresh Nori: Always use fresh nori sheets to wrap your musubi. Older sheets can become tough and chewy, detracting from the overall texture.
• Mold for Consistency: For uniformity, use a musubi mold or a cleaned Spam can to shape the rice. This ensures enjoyable bites of Chicken Katsu Musubi every time.
Chicken Katsu Musubi Recipe FAQs
How do I choose the best chicken for my Chicken Katsu Musubi?
Absolutely! For the most flavorful and juicy Chicken Katsu Musubi, I recommend using boneless skinless chicken thighs. They offer a great balance of tenderness and moisture. If you prefer a leaner option, chicken breast works as well. Just remember that breast meat can be drier, so be careful not to overcook it.
How should I store leftover Chicken Katsu Musubi?
Leftover Chicken Katsu Musubi can be kept in an airtight container in the fridge for up to 1 day. While the rice may lose some of its original texture, the flavors will still be delightful! If you can, I suggest consuming them fresh for the best experience.
Can I freeze Chicken Katsu Musubi for later?
Yes, you can! To freeze Chicken Katsu Musubi, wrap each piece tightly in plastic wrap and place them in a freezer-safe bag. They will stay good for up to 1 month. When you’re ready to enjoy them, simply reheat in the oven at 350°F for about 10-15 minutes to restore their crispy texture.
What if my Chicken Katsu doesn’t get crispy?
Very! If your Chicken Katsu isn’t achieving that coveted crispiness, ensure that your oil is hot enough—around 350°F is ideal. Use a thermometer if you have one. Also, avoid overcrowding the pan, as this can lower the oil temperature and create soggy chicken. Fry in batches if necessary!
Are there any dietary considerations for Chicken Katsu Musubi?
Yes, it’s essential to consider dietary needs! This recipe contains gluten due to the all-purpose flour and panko breadcrumbs. For a gluten-free version, you can substitute with gluten-free flour and panko alternatives. Additionally, if you’re avoiding eggs, a mixture of flaxseed and water can work wonders as a substitute. Always check the labels for any allergens, especially if preparing for someone with food sensitivities.
Can I make Chicken Katsu Musubi ahead of time?
Definitely! For best results, prepare the chicken katsu in advance and store it separately from the sushi rice and nori. You can keep the cooked chicken in the fridge for up to 3 days. Assemble the musubi just before serving to retain the crispness of the katsu. If you’re short on time, it’s a great way to prep ahead and enjoy a delicious meal on the go!
Delicious Chicken Katsu Musubi: Snack Time Bliss Awaits
Ingredients
Equipment
Method
- Prepare the Chicken by pounding boneless skinless chicken thighs to a uniform ½-inch thickness using a meat mallet.
- Make the Katsu Breading by combining large eggs, all-purpose flour, salt, and ground black pepper in a shallow dish.
- Coat the Chicken by dredging each pounded chicken thigh in the egg batter and then pressing into panko breadcrumbs.
- Fry the Chicken in a large skillet with heated neutral oil at 350°F for about 4-6 minutes per side.
- Prepare the Sushi Rice by fluffing the cooked sushi rice gently with a rice paddle.
- Assemble the Musubi by laying a nori sheet flat, packing approximately ½ cup of sushi rice into a mold.
- Add the Chicken and Sauce by spreading tonkatsu sauce over the rice and placing crispy fried chicken on top.
- Wrap and Seal the nori around the rice and chicken, using water to seal the edges.
Leave a Reply