
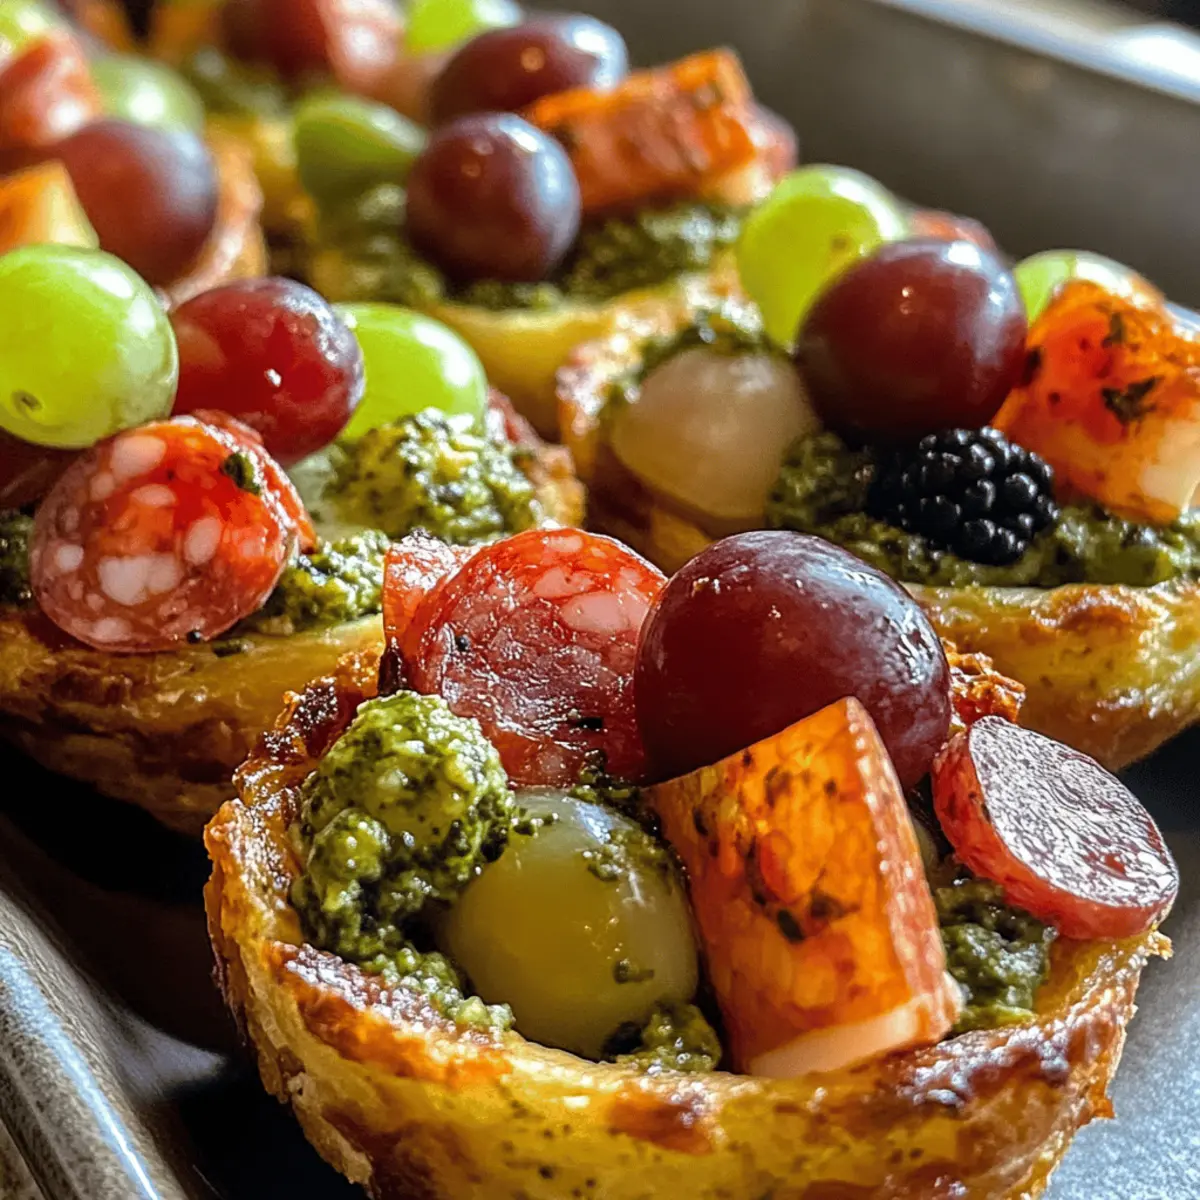
As the holidays approach, my kitchen transforms into a whirlwind of flavors and aromas. This year, I’ve stumbled upon a delightful recipe that truly captures the spirit of Thanksgiving: Individual Cornucopia Charcuterie Cups. These charming, crispy cups are not only eye-catching but also incredibly easy to whip up, making them the perfect choice for holiday gatherings or a festive potluck. With their golden-brown crust and a variety of delicious fillings, they’re a guaranteed crowd-pleaser that can cater to everyone’s palate. Plus, whether you choose to bake them in your oven or use an air fryer, these cups can be made in a snap, leaving you more time to enjoy the festivities. Curious how to create these edible works of art? Let’s dive in!
Why Are These Cornucopia Cups So Special?
Unique Presentation: These Individual Cornucopia Charcuterie Cups are not only delicious but also a feast for the eyes, making them perfect for entertaining during the festive season.
Versatile Fillings: With the option to customize your fillings, you can adapt these cups to suit every guest’s taste, whether you prefer savory meats or sweet fruits.
Quick Preparation: The easy-to-follow steps mean you can create these delightful cups in a flash, freeing up time for the holiday festivities.
Perfect for Sharing: These charming cups encourage mingling and sharing, making them a great addition to any gathering.
Innovative Cooking Method: Choose between baking in the oven or air-frying for a crispy perfection that suits your kitchen setup. Plus, while you’re at it, try some Butter Oat Cups for an easy dessert option!
Kid-Friendly Fun: They’re also a hit with kids, providing a fun way for little hands to enjoy their food while exploring different flavors.
Individual Cornucopia Charcuterie Cups Ingredients
For the Dough
- Bread Dough – Use homemade or convenient Pillsbury French bread roll for a crispy base.
- 1 Egg (for egg wash) – Essential for achieving a beautiful golden finish that enhances presentation.
- Cooking Spray – Prevents sticking and ensures easy removal from the mold.
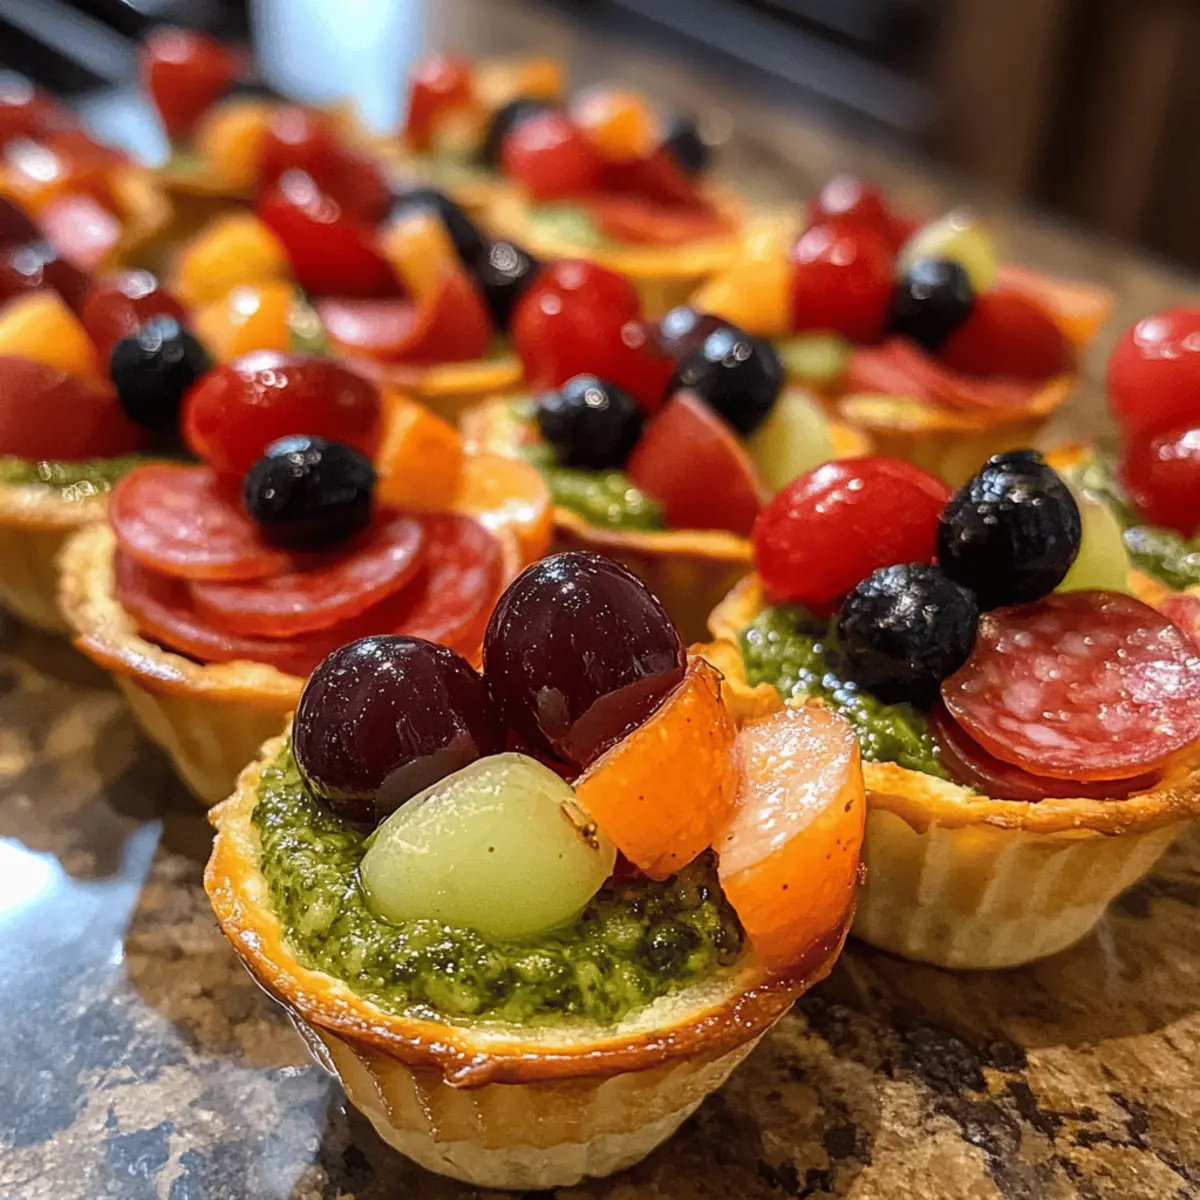
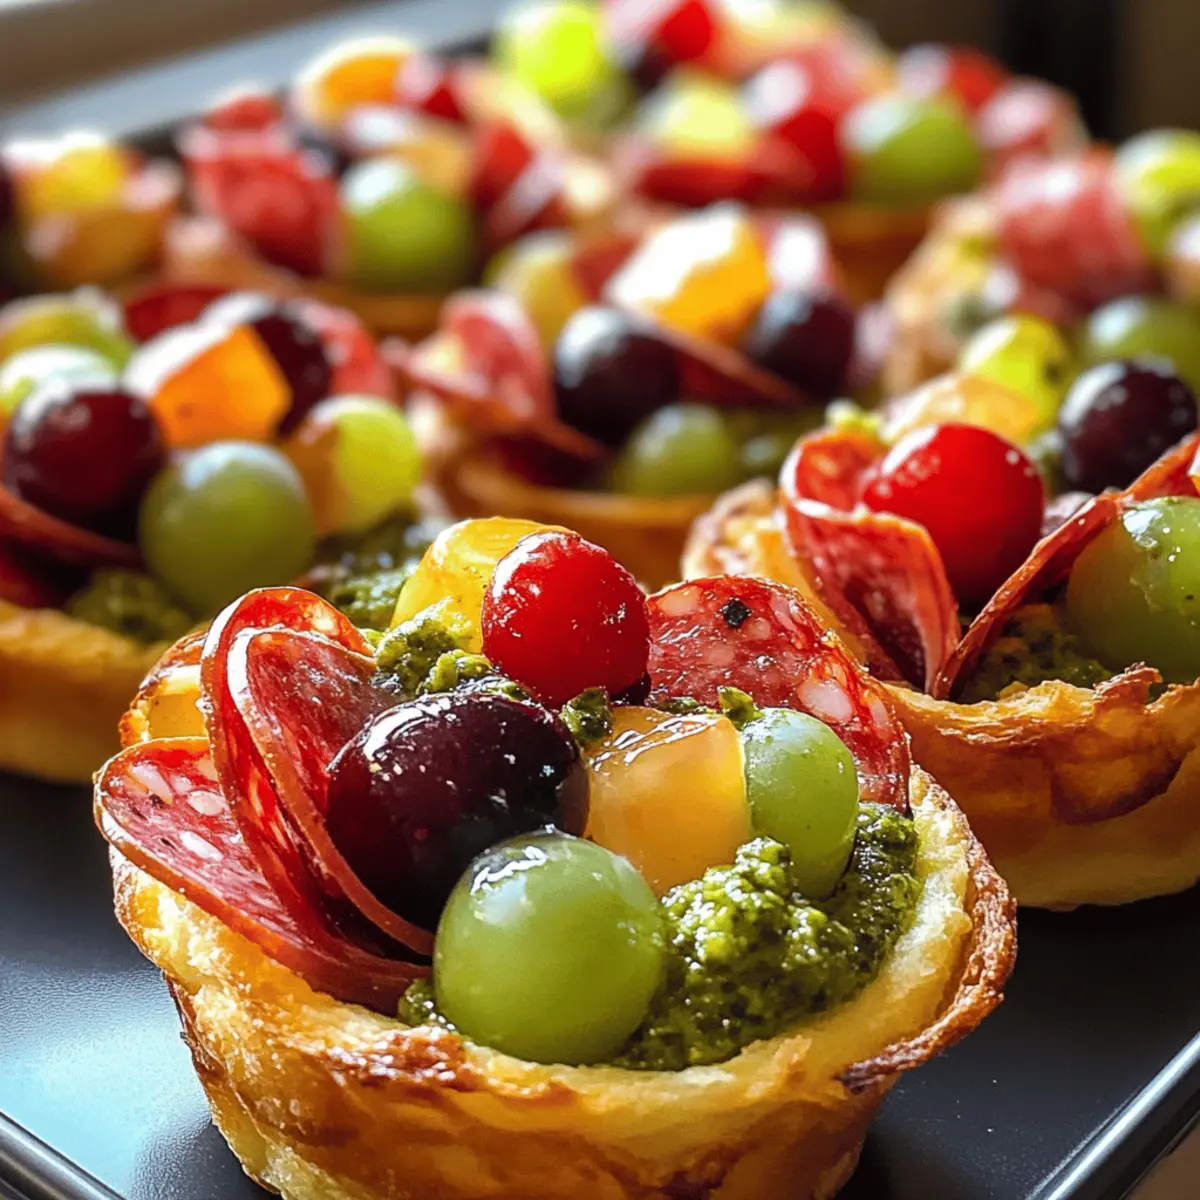
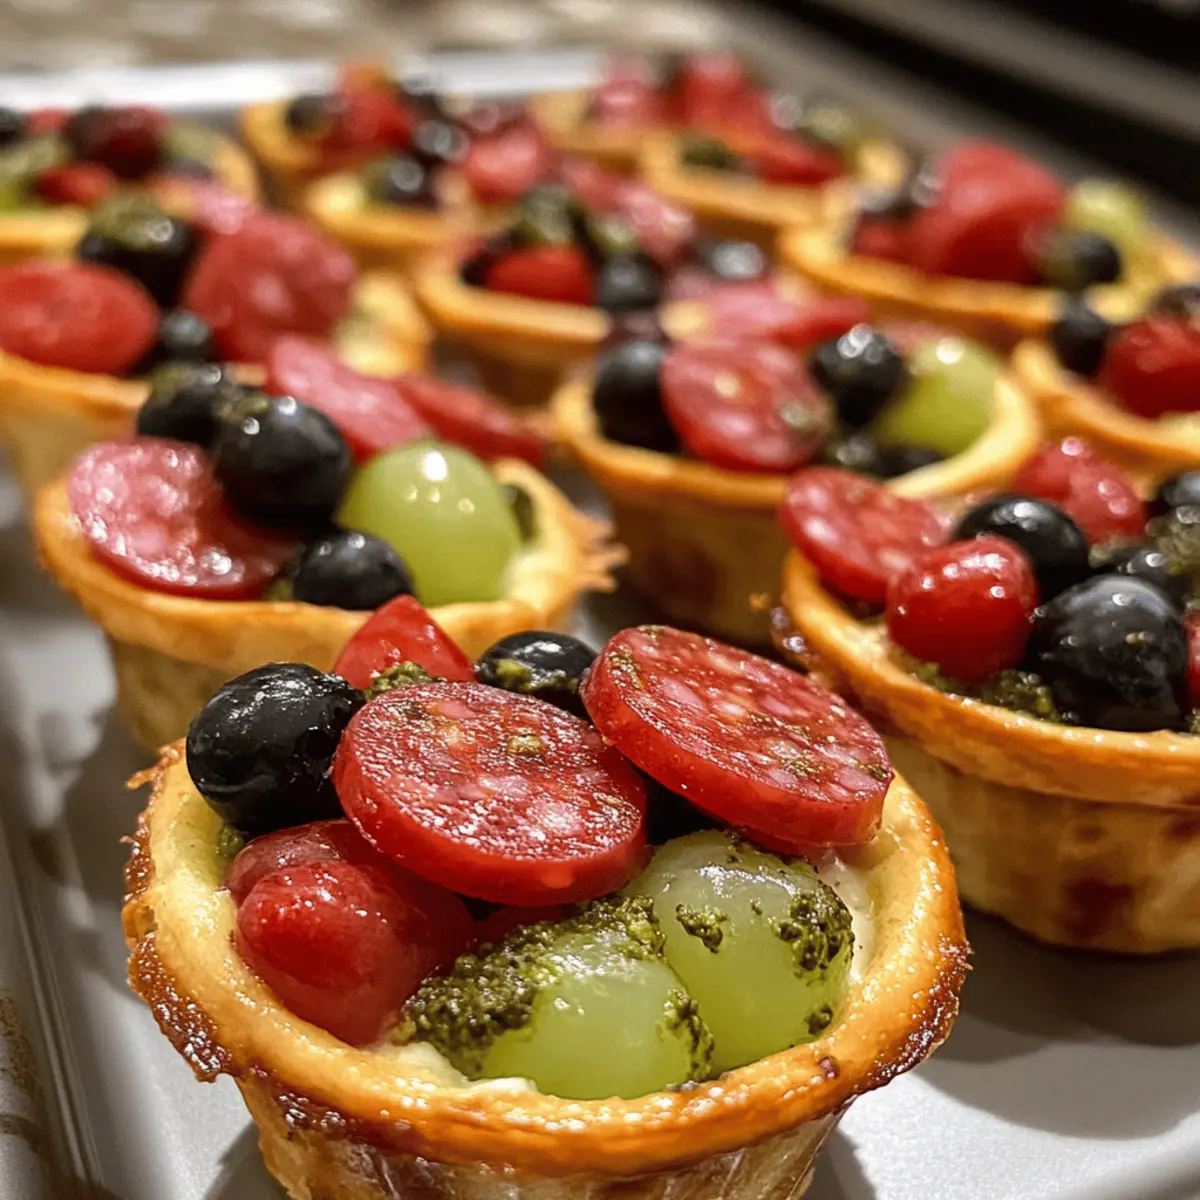
For the Filling
- Pesto Monterey Cheese (triangled) – Offers a creamy, savory punch; swap for your favorite cheese if desired.
- Pepperoni – Brings a savory kick; consider turkey pepperoni for a lighter alternative.
- Salami – Adds a lovely flavor contrast; substitute with any cured meat you prefer.
- Grapes – Contributes freshness and sweetness; sliced apples or pears make a great swap.
- Blueberries – Infuses sweetness; feel free to use other berries if that’s what you have handy.
- Strawberry (quartered) – Provides bursting color and sweetness; opt for any in-season fruit as a substitute.
- Blackberries – Offer another layer of flavor; raspberries work well if you prefer.
- Pistachios – Introduce crunch and texture; walnuts or almonds can also be a delightful choice.
- Fresh Sage & Rosemary – Aromatic herbs to elevate the flavor; use dried herbs at half the amount if fresh isn’t available.
These Individual Cornucopia Charcuterie Cups promise a blend of delightful tastes and textures, turning your holiday gatherings into a savory adventure!
Step‑by‑Step Instructions for Individual Cornucopia Charcuterie Cups
Step 1: Prepare Dough
Start by preheating your oven to 375°F or your air fryer to 325°F, depending on your cooking method. Roll out the bread dough to a thickness of about ¼ inch and cut it into strips measuring ¼ inch wide. These strips will form the base of your Individual Cornucopia Charcuterie Cups, so ensure they are uniform for even cooking.
Step 2: Shape Cornucopia
Take sheets of aluminum foil and mold them into a loose cornucopia shape. The foil should not be tightly packed to allow for steam to escape as the cups cook. This will ensure your Individual Cornucopia Charcuterie Cups maintain their crispy texture while being beautifully formed for serving.
Step 3: Wrap Dough
Lightly spray the exterior of the foil cornucopia with cooking spray; this prevents the dough from sticking. Begin wrapping the bread dough strips around the cornucopia shape, starting from the tip and spiraling upwards. Ensure each strip overlaps slightly, creating a sturdy structure that will hold the filling inside.
Step 4: Seal and Decorate
Once the cornucopia is entirely wrapped in dough, tuck the ends into the bottom to secure them and keep the shape intact. Use the egg wash to attach the last dough strip and brush the entire cornucopia with the egg wash. This step will help achieve that gorgeous golden color while cooking, elevating your Individual Cornucopia Charcuterie Cups’ presentation.
Step 5: Cook
Carefully place the prepared cornucopias on wax paper, ensuring they aren’t touching to allow for proper air circulation. If using an air fryer, cook at 325°F for about 6-7 minutes, or until golden brown. If using the oven, bake at 375°F for 15-20 minutes. Keep an eye on them for that perfect golden finish! Let them cool slightly before carefully removing the foil.
Step 6: Fill and Serve
Once cooled, you can start filling your Individual Cornucopia Charcuterie Cups with your chosen fillings, such as cheeses, meats, and fruits. Arrange them beautifully for a stunning presentation. Serve these delightful appetizers warm, allowing your guests to enjoy the crispy exterior and flavorful fillings.
What to Serve with Individual Cornucopia Charcuterie Cups?
Elevate your festive gathering with delightful pairings that complement the charming flavors of these charcuterie cups.
-
Crispy Green Salad: A refreshing mix of greens, cucumber, and lemon vinaigrette adds a light contrast to the savory cups. The crunch and acidity cleanse the palate beautifully.
-
Savory Cheese Platter: Serve alongside an assortment of cheeses like brie, gouda, and blue cheese. The variety will enhance the flavor experience and invite guests to mix and match.
-
Herbed Dips: Pair with basil pesto or creamy hummus. These dips infuse additional layers of flavor and create a delightful contrast to the crispy cornucopia shells.
-
Bubbly Sparkling Cider: A glass of sparkling cider offers a festive toast that balances the savory richness with a touch of sweetness, making every bite enjoyable.
-
Stuffed Mushrooms: These tender bites filled with savory cheeses and herbs complement the charcuterie cups perfectly, adding more rustic warmth to the table.
-
Roasted Vegetable Medley: Colorful roasted veggies like carrots, bell peppers, and squash bring a sweet earthiness that pairs beautifully with the savory elements of the cups.
-
Fruit Tart: Delight your guests with a light, sweet finish. The fruity flavors provide a wonderful contrast to the indulgent cups while keeping the theme cohesive.
-
Mulled Wine: Warm and spiced, mulled wine brings cozy holiday vibes that pair splendidly with the flavors of the individual cornucopia charcuterie cups, creating a festive atmosphere.
Individual Cornucopia Charcuterie Cups Variations
Feel free to let your creativity shine by customizing these delightful cups to suit your tastes!
-
Vegetarian Delight: Swap the meats for a colorful assortment of roasted vegetables like zucchini and bell peppers. This twist not only makes a vibrant presentation but also caters to veggie lovers.
-
Cheese Lovers: Experiment with different cheeses, such as goat cheese or feta, for a richer flavor profile. Each cheese lends its own character, making every bite delightfully unique.
-
Sweet & Savory Combo: Add a drizzle of honey or balsamic glaze over the fillings for an unexpected sweetness that balances the savory components. This contrast creates a sophisticated flavor experience!
-
Gluten-Free Option: Use gluten-free dough to cater to your guests’ dietary restrictions without sacrificing taste. It’s easy to find gluten-free bread options that work beautifully in this recipe.
-
Spicy Kick: Incorporate jalapeños or a spicy sausage for those who crave heat. The kick will surely elevate the enjoyment and introduce a fun dynamic to your gathering!
-
Nutty Crunch: If you want to experiment with flavors, consider adding a sprinkle of sesame seeds or sunflower seeds for an additional crunch. They bring a delightful texture that’ll keep everyone coming back for more.
-
Mix and Match Fruits: Don’t hesitate to swap out berries for seasonal fruits like peaches or figs, which offer delightful sweetness. Each fruit variation can make the cups feel fresh and exciting.
-
Herb Infusion: Try using different herbs such as thyme or basil for a fragrant twist. Fresh herbs can completely transform your cups, bringing an aromatic freshness to each bite. If you’re interested in pairing these with something sweet, a batch of Butter Oat Cups afterwards would make a lovely finish!
Expert Tips for Individual Cornucopia Charcuterie Cups
-
Dough Thickness Matters: Ensure your bread dough strips are uniformly cut to ¼ inch thick. This helps them cook evenly and achieve that perfect golden-brown finish, essential for your Individual Cornucopia Charcuterie Cups.
-
Avoid Overcrowding: When using an air fryer, don’t cram too many cornucopias in at once. Giving them space allows hot air to circulate properly, leading to a crispy exterior.
-
Egg Wash Importance: Don’t skip the egg wash! Brushing it over the dough before cooking not only enhances color but also locks in moisture for a delightful texture.
-
Watch the Cooking Time: Cooking times can vary based on the air fryer or oven model used. Always check your Individual Cornucopia Charcuterie Cups a couple of minutes before the indicated time to avoid burning.
-
Creative Fillings: Feel free to get inventive with your filling options! Using different cheeses, meats, or even roasted vegetables can elevate flavor and ensure every guest finds their favorite.
How to Store and Freeze Individual Cornucopia Charcuterie Cups
Fridge: Store any leftover cornucopia cups in an airtight container in the fridge for up to 3 days. This helps keep the filling fresh while maintaining a bit of crispness.
Freezer: If you’re looking to make these cups ahead of time, freeze the assembled but uncooked cornucopias. Wrap them tightly in plastic wrap and foil, and they’ll keep for up to 2 months.
Reheating: To reheat, simply bake at 375°F for about 10-12 minutes until warmed through and crispy again. Avoid microwaving, as this may make them soggy.
Freshness Tip: For the best taste, enjoy your Individual Cornucopia Charcuterie Cups fresh and warm right after baking.
Make Ahead Options
These Individual Cornucopia Charcuterie Cups are perfect for busy home cooks looking to save time during the holiday rush! You can prepare the dough and shape the cornucopias up to 24 hours in advance; just wrap them tightly in plastic wrap to maintain their moisture. Additionally, the filling ingredients can be prepped (washed and cut) and stored in the refrigerator for up to 3 days. When you’re ready to serve, simply take the shaped cups out, brush with the egg wash, and bake or air-fry as instructed; they will be just as delicious and crispy as fresh! This means you can enjoy more time with your guests and less time in the kitchen!
Individual Cornucopia Charcuterie Cups Recipe FAQs
What should I look for when selecting the bread dough?
Absolutely! When selecting your bread dough, look for options that are fresh and flexible. If you’re using store-bought dough like Pillsbury French bread rolls, check that the packaging is intact and free from any dark spots. Freshness is key to ensuring a crispy texture when baked.
How long can I store leftover cornucopia cups?
You can store any leftover Individual Cornucopia Charcuterie Cups in an airtight container in the refrigerator for up to 3 days. This will help keep the filling fresh while maintaining a bit of crispness. Just reheat them in the oven for the best results!
Can I freeze the cornucopia cups? If so, how should I do it?
Absolutely! To freeze the cups, assemble the uncooked cornucopias first. Wrap each one tightly in plastic wrap and then in aluminum foil. This method helps prevent freezer burn. They can be stored in the freezer for up to 2 months. When ready to eat, bake them from frozen at 375°F for about 20-25 minutes or until golden and cooked through!
What should I do if my dough won’t stick together?
If your dough isn’t sticking properly, don’t worry! Make sure to secure the ends by tucking them well, and use the egg wash generously. The egg wash not only acts as a glue but also enhances the color of your cornucopias. If they continue to slide, wrapping the strips a bit tighter may help keep everything in place.
Are there any dietary considerations I should keep in mind?
Very! If you’re catering to guests with dietary restrictions, consider using gluten-free bread dough or substituting the fillings. Vegan cheese or meat alternatives can also be used in place of the cheeses and meats. Always check for allergens, especially with nuts and dairy, to ensure everyone can enjoy these delicious treats!
How can I ensure my cornucopias retain their crispiness after cooking?
To keep your Individual Cornucopia Charcuterie Cups crispy, make sure they are not overcrowded in the air fryer or oven. This allows for proper air circulation during cooking. Additionally, avoid microwaving them when reheating, as this can introduce moisture. Instead, return them to the oven for about 10-12 minutes at 375°F to revive that crispy texture!
Delicious Individual Cornucopia Charcuterie Cups for Holidays
Ingredients
Equipment
Method
- Preheat your oven to 375°F or air fryer to 325°F. Roll out the bread dough to ¼ inch thickness and cut into ¼ inch wide strips.
- Mold aluminum foil into a loose cornucopia shape, allowing steam to escape for crispy texture.
- Lightly spray the foil shape with cooking spray and wrap the dough strips around it, overlapping slightly.
- Tuck the ends of the dough and brush with egg wash for a golden finish.
- Place cornucopias on wax paper and cook in air fryer for 6-7 minutes, or bake for 15-20 minutes until golden.
- After cooling slightly, fill the cups with chosen fillings and serve warm.
Leave a Reply