
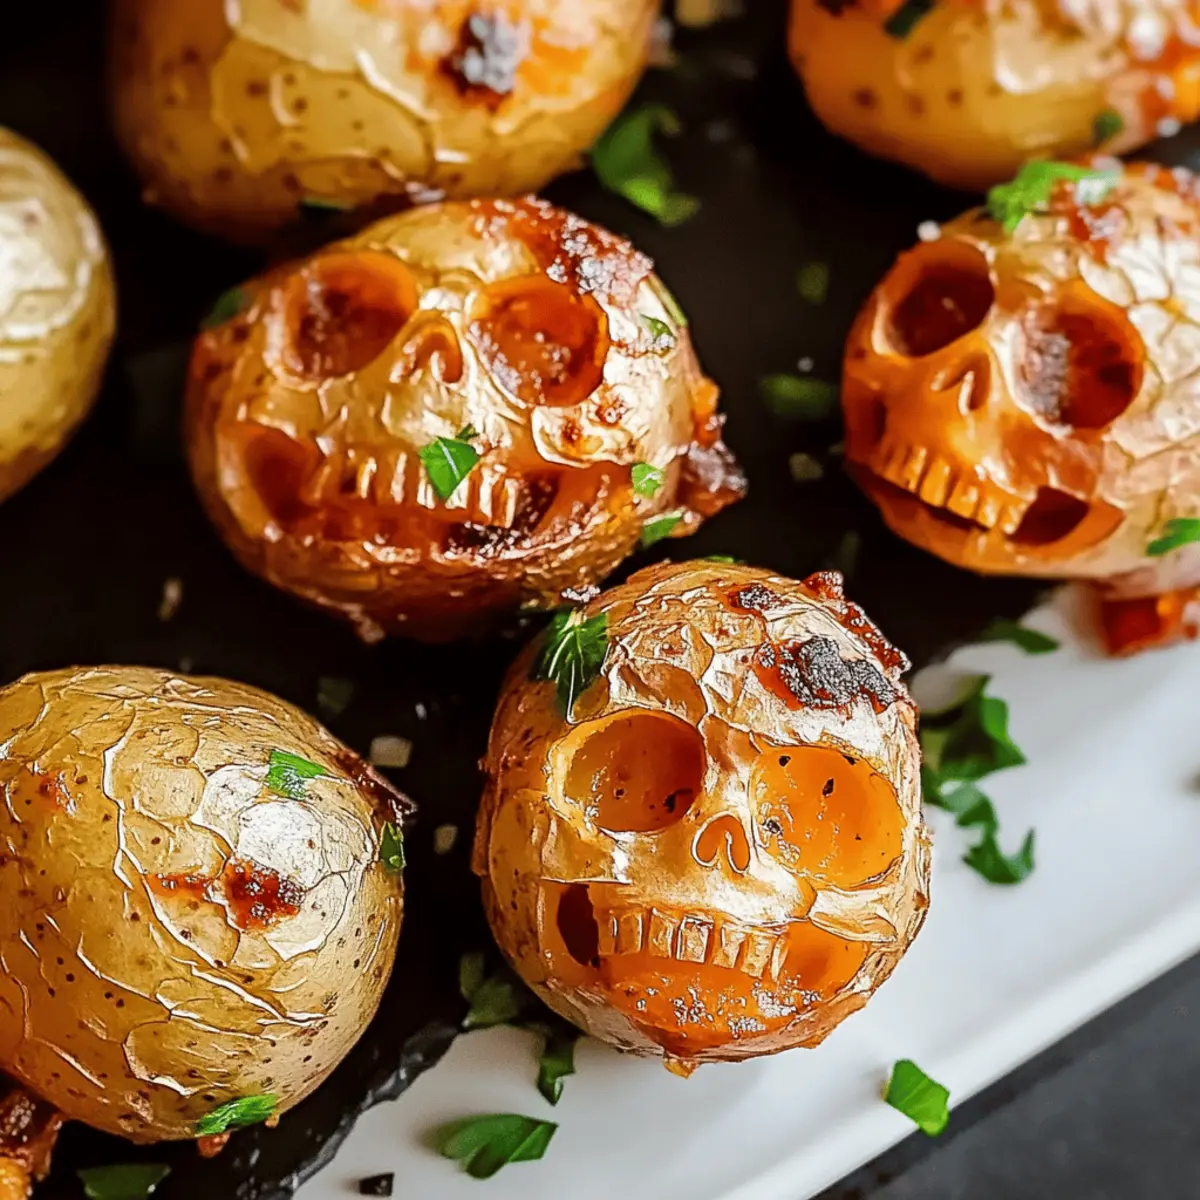
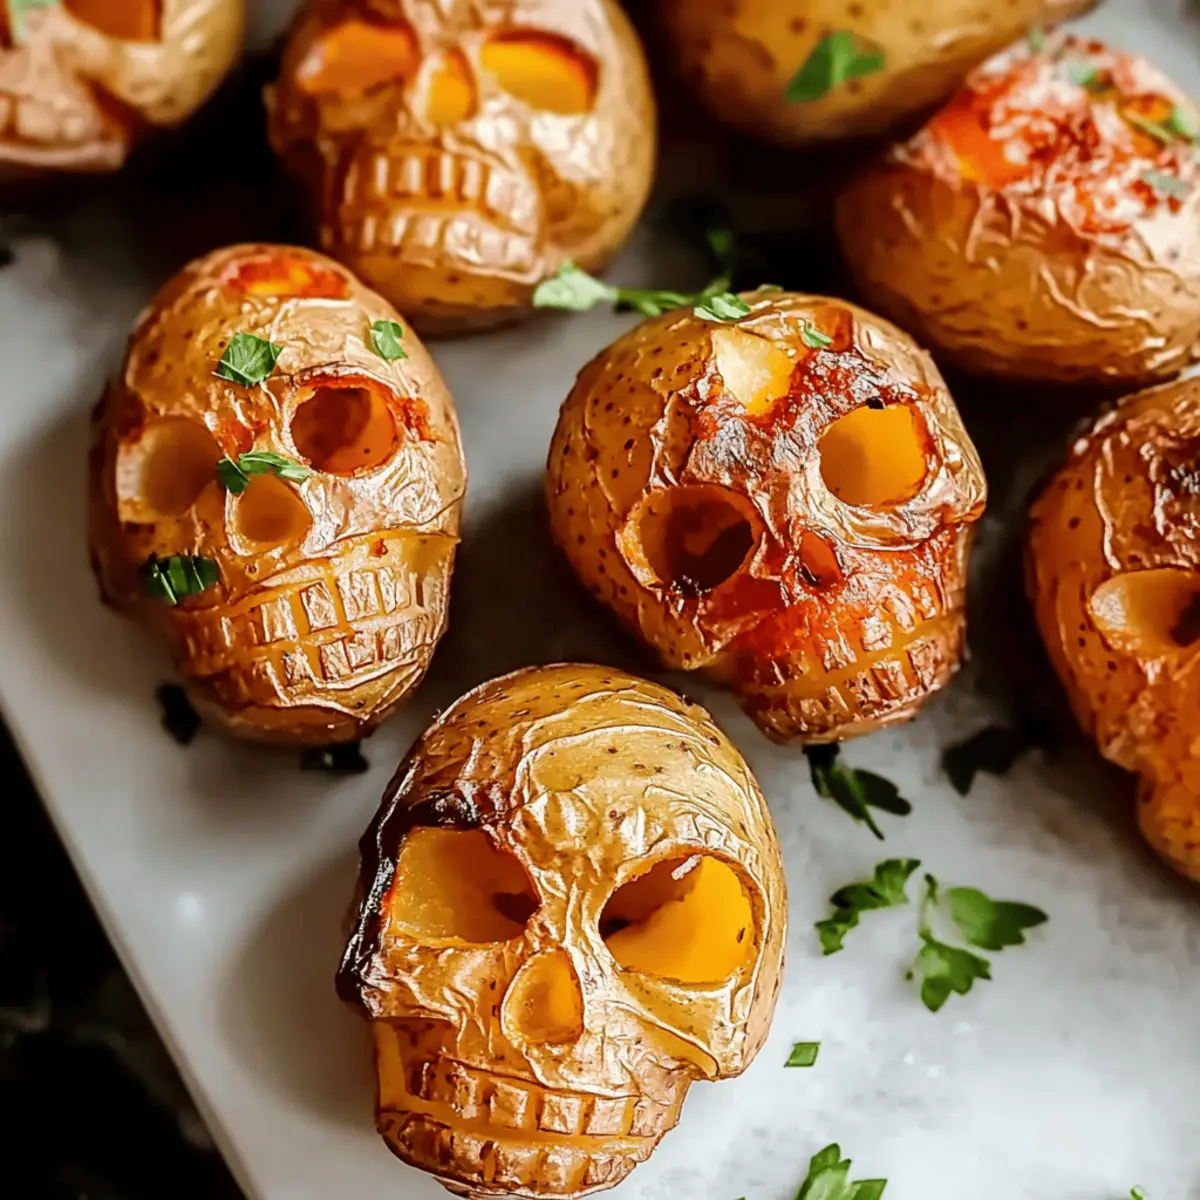
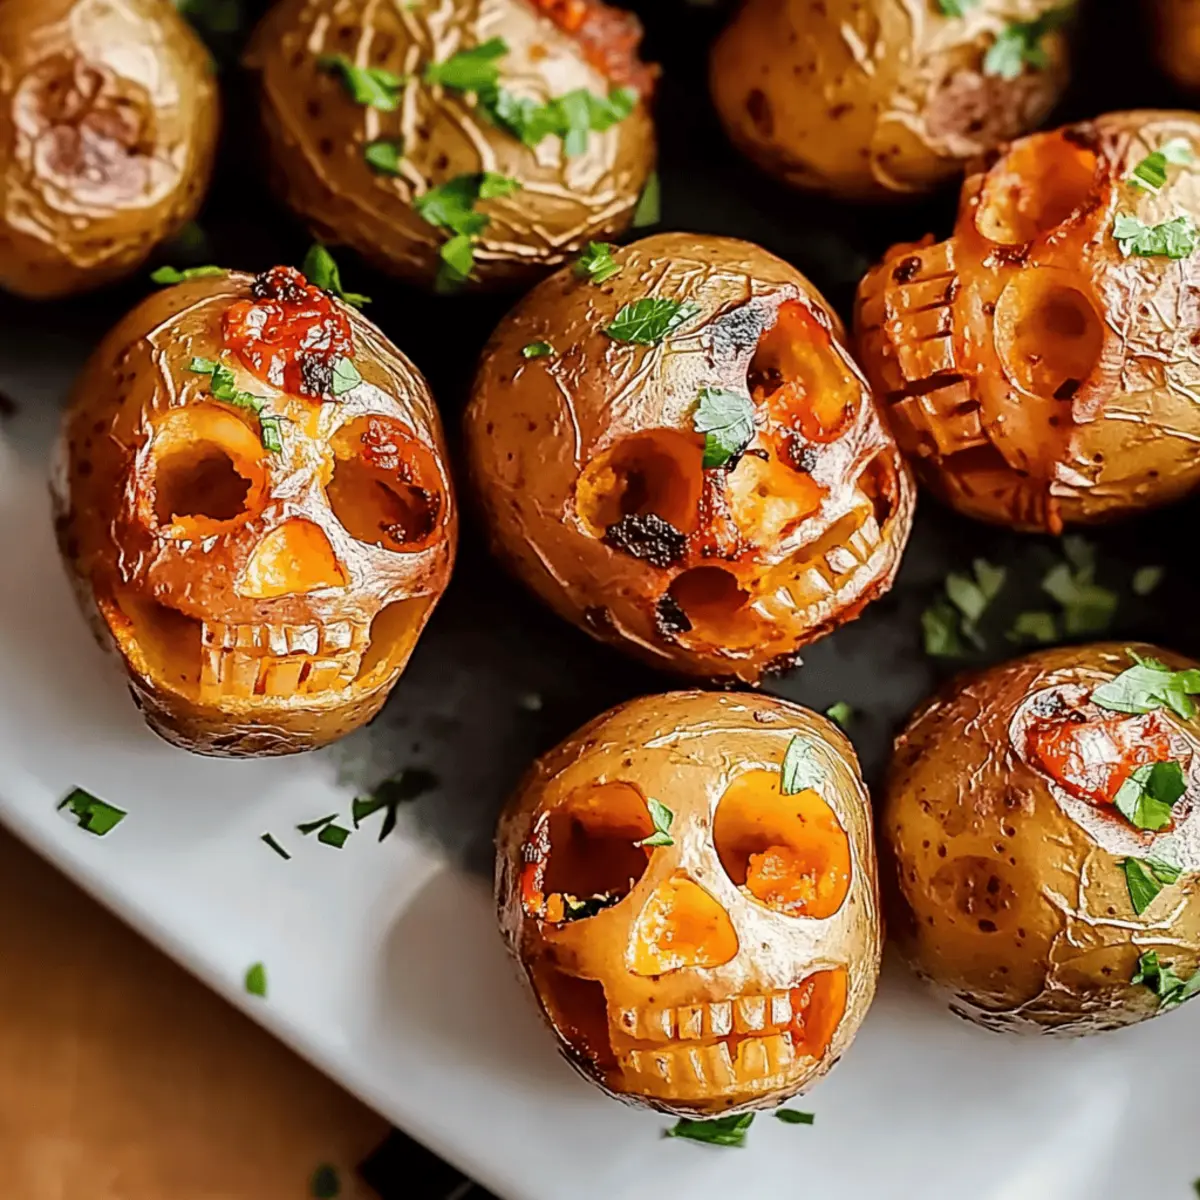
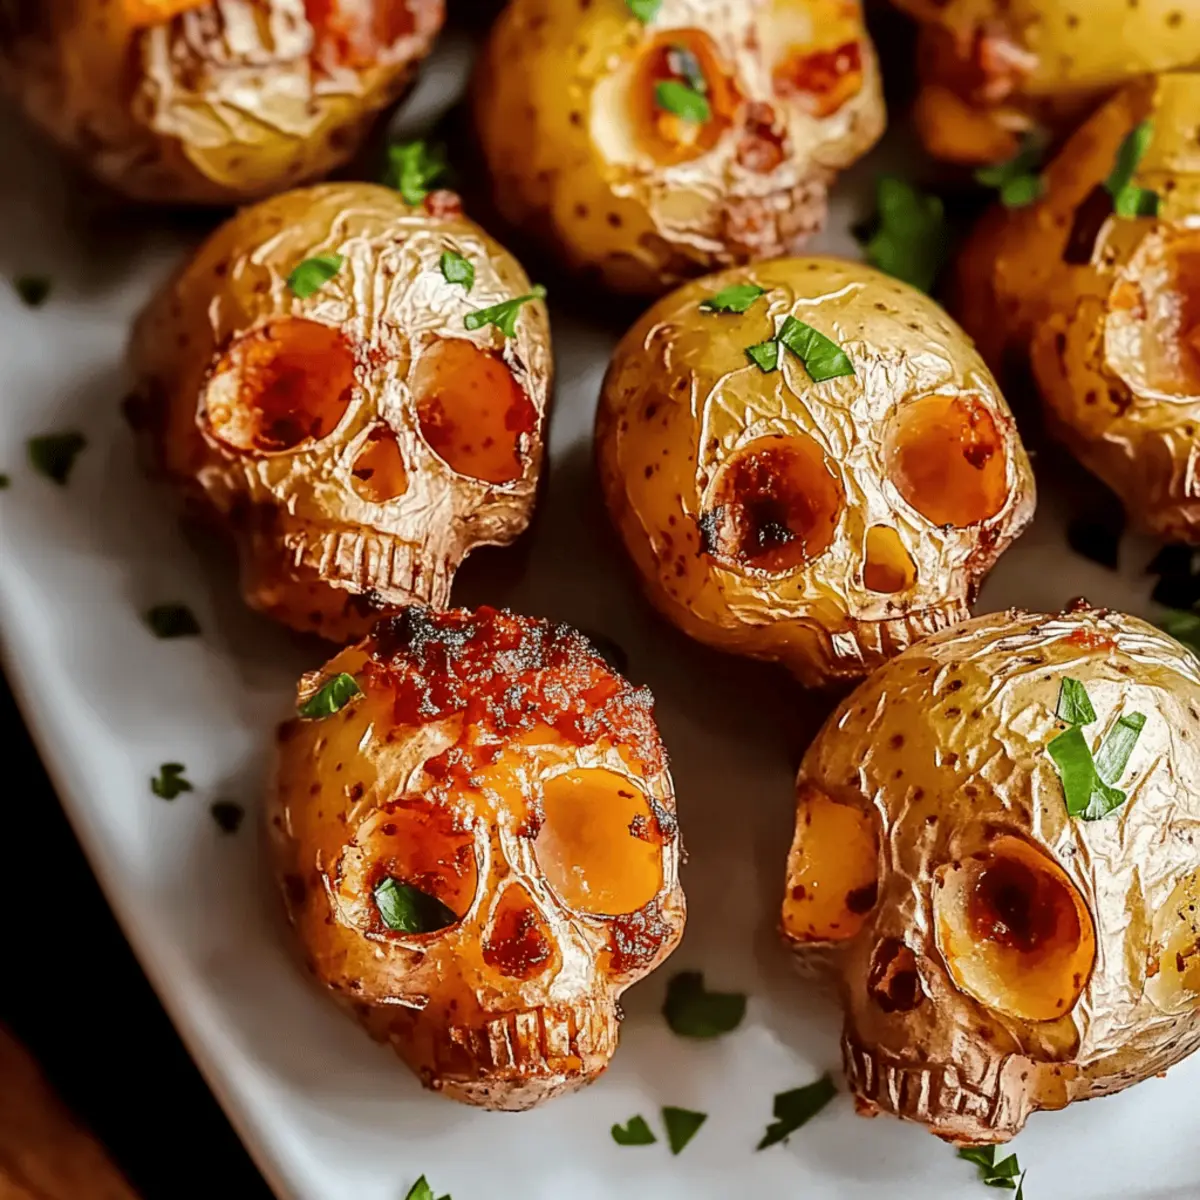
There’s a certain thrill that comes with Halloween, as the air turns crisp and our kitchens become the backdrop for all things spooky. This year, I wanted to bring a unique twist to the usual festive fare, so I whipped up these Halloween Skull Potatoes. Perfectly crispy on the outside with a fluffy interior, they’re not just a treat for the taste buds, but also a playful addition to any Halloween table. With their mesmerizing skull shapes, these potatoes are sure to be the highlight of your celebrations! Plus, they’re incredibly easy to prepare—making them a fantastic choice for busy home chefs looking to impress without the fuss. Ready to get carving and delight your guests with these fun, spooky snacks? Let’s dive into the recipe!
Why Are These Skull Potatoes a Must-Try?
Crispy Perfection: Your guests will rave about the delightful crunch of these Halloween Skull Potatoes, making them a fun alternative to traditional snacks.
Spooky Presentation: The carved skull shapes add a whimsical touch that’s perfect for Halloween gatherings, turning an everyday side dish into a conversation starter.
Versatile Flavor: Enjoy them as is, or elevate their taste by adding toppings like melted cheese or fresh herbs, just like with Cheesy Halloween Breadstick Bones.
Effortless Preparation: With simple ingredients and easy instructions, these potatoes fit seamlessly into your busy schedule.
Crowd-Pleasing Appeal: Not only do they look amazing, but they also satisfy hunger without being overly sweet, making them a perfect accompaniment to any Halloween spread! Pair with other seasonal delights like Halloween Vampire Bite Cupcakes for a complete treat.
Halloween Skull Potatoes Ingredients
• Get ready to carve some fun!
For the Potatoes
- Mini Creamer Potatoes or Baby Yukon Golds – The ideal size ensures even cooking and great flavor; avoid larger types for best results.
- Olive Oil – This helps achieve that perfect crispy exterior; feel free to substitute with vegetable oil if necessary.
- Salt – Essential for flavor enhancement; use generously to season the surface for crispy perfection.
- Pepper – Adds just the right amount of zing; adjust according to your taste preferences.
For Toppings (Optional)
- Shredded Cheese – A gooey addition for extra flavor; cheddar or mozzarella works beautifully.
- Fresh Herbs – Sprinkle on top for a pop of freshness; parsley or chives complement the flavors nicely.
With these Halloween Skull Potatoes ingredients, you’re set for a spooktacular celebration that’s sure to delight!
Step‑by‑Step Instructions for Halloween Skull Potatoes
Step 1: Prepare the Potatoes
Start by preheating your oven to 425°F (220°C). While the oven heats, wash your mini creamer potatoes or baby Yukon Golds thoroughly under cold water to remove any dirt. Pat them dry with a clean towel to ensure they crisp up nicely. This is the perfect base for your Halloween Skull Potatoes.
Step 2: Carving
Using a sharp paring knife, carefully carve skull shapes into the surfaces of each potato. Begin by outlining features like the eyes, nose, and mouth before cutting deeper for more definition. Take your time to be precise, as this will bring your Halloween Skull Potatoes to life! Ensure you cut away from your hands for safety.
Step 3: Seasoning
Drizzle the carved potatoes with olive oil, ensuring every crevice gets a good coating. Generously sprinkle salt and pepper over the surface to enhance the flavor. As you prepare these Halloween Skull Potatoes, the oil will help achieve that irresistible crispy texture while also bringing out the natural taste of the potatoes.
Step 4: Baking
Arrange the seasoned, carved potatoes on a baking sheet in a single layer, ensuring they are not overcrowded. Place the baking sheet in the preheated oven and bake for 30–35 minutes, or until the potatoes are golden brown and crispy. Flip them halfway through baking to get even crispiness on all sides.
Step 5: Cooling
Once the Halloween Skull Potatoes are perfectly crispy and golden, remove them from the oven. Allow them to cool for about 1-2 minutes on the baking sheet. This brief cooling period enhances their crispiness, making them ready for serving. Your spooky snacks are now a delightful addition to your Halloween feast!
Halloween Skull Potatoes Variations
Feel free to get creative and customize these Halloween Skull Potatoes for a unique twist that suits your taste—let’s embrace the fun of the season!
- Cheesy Delight: Top the potatoes with shredded cheese before baking for a gooey, melty finish. Cheddar or mozzarella can add an irresistible flavor boost.
- Herbaceous Twist: After baking, sprinkle fresh herbs like parsley or chives on top. This simple touch adds freshness and a pop of color to your spooky snacks.
- Spicy Kick: Sprinkle a pinch of cayenne pepper or paprika before baking for a spicy version that will get your taste buds dancing. Not too hot, just the right amount of zip!
- Bacon Boost: Before serving, crumble cooked bacon over the baked potatoes for a savory crunch. The smoky flavor pairs perfectly with the fluffy interior.
- Garlic Infusion: Toss the potatoes with minced garlic mixed with olive oil before baking. It’s a flavorful twist that garlic lovers will adore!
- Vegan Option: Use avocado oil instead of olive oil and skip the cheese for a delicious vegan version. These skulls will still be crispy and satisfying!
- Curried Flavor: Incorporate a teaspoon of curry powder into the olive oil before drizzling it over the potatoes. This sweet and aromatic spice adds an unexpected layer of flavor.
- Fruity Finish: Add a touch of sweetness by serving these potatoes paired with a dollop of apple sauce or a fruit salsa for a surprising contrast.
Whether you stick to the traditional skull shapes or explore these delightful variations, your Halloween Skull Potatoes will surely be a highlight. Pair them with other fun creations, like Savory Slow Cooker Lipton Onion Potatoes, for a festive spread that’s simple to prepare and oh-so-delicious!
What to Serve with Halloween Skull Potatoes
These festive treats are the perfect centerpiece for your Halloween feast, inviting both excitement and flavors that leave lasting memories.
- Crispy Garlic Bread: The fabulous crunch and buttery garlic flavor blend beautifully with the soft insides of the skull potatoes, creating a harmonious flavor profile.
- Zesty Coleslaw: This refreshing side adds a crunchy contrast and bright acidity that balances the richness of the crispy potatoes, making each bite delightful.
- Pumpkin Soup: A warm, creamy option that pairs wonderfully with the Halloween theme, offering a comforting touch alongside the crispy snacks. Each spoonful complements the hearty crunch of the potatoes beautifully.
- Stuffed Eyeball Olives: A fun, spooky addition that adds a savory bite, inviting guests to indulge in unique flavors while enjoying the festive vibe.
- Roasted Beet Salad: The earthy sweetness of beets enhances the Halloween colors while providing a chewy texture that contrasts with the crispy potatoes.
- Apple Cider Mimosas: Refreshing and slightly sweet, this drink option will elevate your Halloween gathering, making the feast both festive and fun.
- Chocolate Mousse Cups: For dessert, these rich, creamy delights add a touch of indulgence that balances the savory snacks perfectly, leaving guests with a smile.
- Marshmallow Ghosts: Light and fluffy, these spooky treats bring a playful element to your spread, echoing the festive spirit and delighting your guests.
- Hocus Pocus Punch: A vibrant, fun drink that adds a magical touch to your Halloween feast, ensuring everyone stays refreshed throughout the celebration!
- Caramel Apples: This classic treat rounds out the meal with a sweet crunch, creating a delightful contrast to the savory Halloween Skull Potatoes.
Expert Tips for Halloween Skull Potatoes
-
Perfectly Crispy: Allow the potatoes to cool slightly after baking; this helps them achieve maximum crispiness without losing texture.
-
Don’t Overcrowd: Spread the potatoes out on the baking sheet. Overcrowding them can lead to steaming rather than browning, which is a common mistake.
-
Careful Carving: Use a paring knife to outline the skull features before making deeper cuts. This ensures a cleaner, more defined look for your Halloween Skull Potatoes.
-
Optimal Seasoning: Don’t skimp on salt and pepper! Generous seasoning enhances the potatoes’ flavors, and remember, you can always adjust to taste.
-
Play with Designs: Feel free to experiment with different spooky faces and shapes while carving, adding a personal touch to your Halloween Skull Potatoes.
How to Store and Freeze Halloween Skull Potatoes
Fridge: Store any leftover Halloween Skull Potatoes in an airtight container for up to 1 day. They’re best enjoyed fresh, but the fridge can keep them ready for a quick snack.
Freezer: These spooky snacks can be frozen before baking! Place them on a baking sheet to freeze individually, then transfer to a freezer-safe bag for up to 3 months. Bake directly from frozen, adding a few extra minutes to the cooking time.
Reheating: To bring back the crispy goodness, reheat in a preheated oven at 400°F (200°C) for about 10 minutes. This method helps revive their delightful crunch without making them soggy.
Room Temperature: If Leftover Halloween Skull Potatoes sit out, consume them within 2 hours to avoid food safety issues. Store any uneaten portions promptly to keep them fresh longer.
Make Ahead Options
These Halloween Skull Potatoes are ideal for meal prep, allowing you to whip up a spooky side dish with ease! You can carve the potatoes and season them up to 24 hours in advance. Simply refrigerate the prepared potatoes in an airtight container, ensuring they don’t dry out. When you’re ready to enjoy, just preheat your oven, arrange them on a baking sheet, and bake as directed—this way, you’ll have crispy, golden potatoes in no time, perfect for busy weeknights or last-minute gatherings. By preparing ahead, you maintain their flavors and textures, ensuring your Halloween Skull Potatoes are just as delicious when serving!
Halloween Skull Potatoes Recipe FAQs
What type of potatoes work best for Halloween Skull Potatoes?
For Halloween Skull Potatoes, I highly recommend using Mini Creamer Potatoes or Baby Yukon Golds. Their small, uniform size ensures even cooking and a crispy texture. Larger or waxy varieties may not yield the best results, as they can become mushy instead of crispy. Trust me, you want those tiny gems for the ultimate Halloween treat!
How should I store leftover Halloween Skull Potatoes?
To keep your leftover Halloween Skull Potatoes fresh, store them in an airtight container in the refrigerator for up to 1 day. They’re best served fresh for maximum crunch. If you’re grabbing a snack later, just remember to reheat them in an oven for that delicious crispy texture!
Can I freeze Halloween Skull Potatoes?
Absolutely! You can freeze Halloween Skull Potatoes before baking. Start by placing the carved potatoes on a baking sheet and freeze them individually. Once solid, transfer them to a freezer-safe bag, where they’ll stay fresh for up to 3 months. When ready to bake, just pop them straight from the freezer into the oven, adding a few extra minutes to the baking time. Easy and convenient!
What should I do if my Halloween Skull Potatoes aren’t crispy?
If your Halloween Skull Potatoes don’t turn out crispy, it could be due to overcrowding on the baking sheet, which causes steaming instead of roasting. Make sure to arrange them in a single layer with space in between. Additionally, allow them to cool on the baking sheet for a minute or two after baking; this lets them crisp up even more. Remember, using the right amount of oil and seasoning is crucial for that delightful crunch!
Are Halloween Skull Potatoes safe for pets?
While potatoes can be safe for dogs in small amounts, ensure they are fully cooked and free of seasoning and oils when giving them as a treat. That said, it’s best to avoid sharing these Halloween Skull Potatoes since they contain salt and other seasonings that may not be suitable for pets. Always prioritize your furry friend’s health and stick to pet-friendly snacks!
Crispy Halloween Skull Potatoes You Can’t Resist
Ingredients
Equipment
Method
- Preheat your oven to 425°F (220°C) and wash the potatoes under cold water, then dry them with a towel.
- Carefully carve skull shapes into each potato using a sharp paring knife.
- Drizzle the carved potatoes with olive oil and generously season with salt and pepper.
- Arrange the potatoes on a baking sheet and bake for 30–35 minutes, flipping halfway through.
- Allow the baked potatoes to cool for 1-2 minutes on the baking sheet before serving.
Leave a Reply