
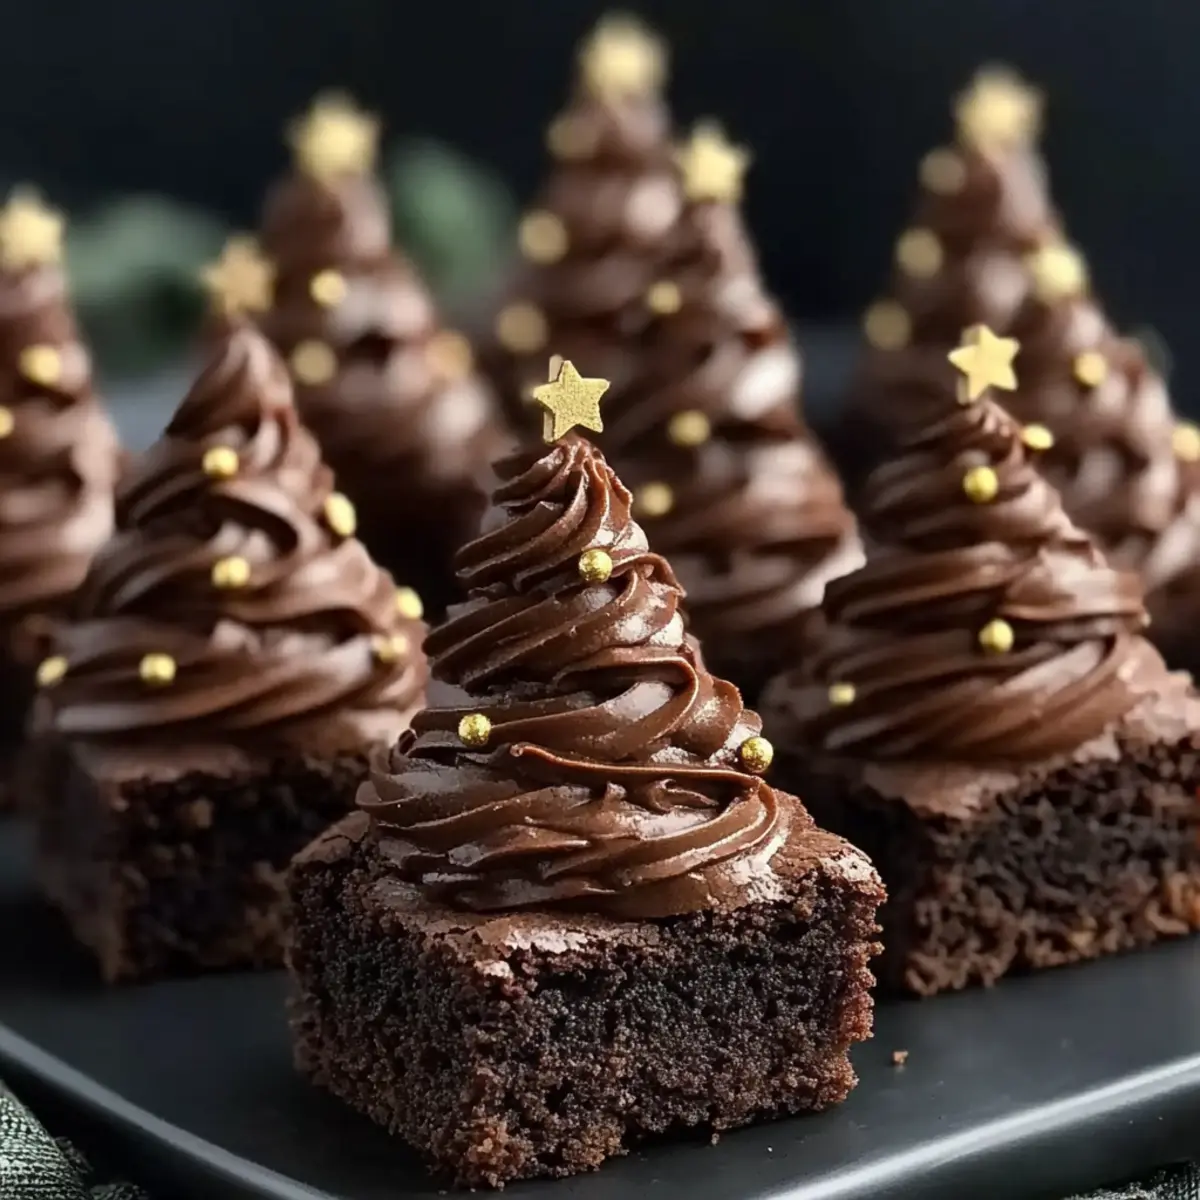
As the festive season approaches, my kitchen transforms into a haven filled with warm aromas and cheerful laughter. This year, I’m excited to share my recipe for Christmas Tree Brownies with Chocolate Buttercream—a delightful dessert that not only captivates the eyes but also warms the heart. These rich, fudgy brownies topped with creamy chocolate buttercream bring a whimsical touch to your holiday gatherings, making them perfect for baking with kids, gifting to friends, or simply indulging in a cozy evening at home. With their simple ingredient list and quick prep time, these brownies are sure to become a holiday staple. Who wouldn’t want a treat that sparks joy and festive cheer? Let’s dive into the magic of baking these enchanting Christmas Tree Brownies!
Why are Christmas Tree Brownies a must-try?
Whimsical Presentation: These adorable brownies resemble festive Christmas trees, adding a playful touch to your holiday dessert table.
Fudgy Delight: Indulge in rich, chocolatey goodness that melts in your mouth, striking the perfect balance of sweetness and texture.
Fun for All Ages: Gather the family for a delightful baking session—kids will love helping decorate these tasty treats!
Quick Preparation: With accessible ingredients and simple techniques, you can whip up these brownies in no time—perfect for last-minute holiday gatherings.
Versatile and Customizable: Whether you prefer sprinkles, edible stars, or crushed candy canes, the decorating options are endless! For more chocolatey goodness, check out my Chocolate Babka Decadent or Chocolate Rum Balls.
Christmas Tree Brownie Ingredients
Transform these delights into holiday magic with simple ingredients!
For the Brownie Batter
• Dark Chocolate – Provides a deep chocolate flavor; semi-sweet or milk chocolate can be used for a sweeter twist.
• Butter – Adds creaminess and helps create a fudgy texture; use unsalted for better control of salt.
• Granulated Sugar – Sweetens the mix while contributing to the brownie’s structure.
• Eggs – Binds the ingredients together, ensuring moisture and richness in every bite.
• Vanilla Extract – A key aromatic element that enhances the overall flavor profile.
• All-Purpose Flour – Gives the brownies their structure; a gluten-free blend can be swapped for a gluten-free version.
• Cocoa Powder – Intensifies the chocolate flavor; consider using Dutch-processed for added complexity.
• Salt – Balances sweetness and elevates the chocolate flavor.
For the Chocolate Buttercream
• Powdered Sugar – Sweetens and thickens the buttercream, creating a delightful frosting.
• Milk or Cream – Adjusts the buttercream’s consistency, making it easy to pipe.
For Decorating
• Edible Decorations (e.g., gold pearls, stars) – Adds festive flair to the brownies, turning them into whimsical trees of delight!
These Christmas Tree Brownies with Chocolate Buttercream will be the star of your holiday dessert spread, and they’re easier to make than you might think!
Step‑by‑Step Instructions for Christmas Tree Brownies with Chocolate Buttercream
Step 1: Preheat the Oven and Prepare the Pan
Begin by preheating your oven to 175°C (350°F). While it heats up, grab a square baking pan and line it with parchment paper, ensuring it covers the sides for easy brownie removal later. This simple step will help your Christmas Tree Brownies release effortlessly and maintain their delightful shape.
Step 2: Melt Chocolate and Butter
In a medium-sized microwave-safe bowl, combine dark chocolate and unsalted butter. Heat them in the microwave in 30-second intervals, stirring in between until fully melted and smooth. This luscious mixture is the foundation of our fudgy brownies, so take care not to overheat and burn the chocolate.
Step 3: Combine Sugar, Eggs, and Vanilla
Once your chocolate and butter mixture has cooled slightly, whisk in the granulated sugar until combined. Next, add in the eggs one at a time, followed by the vanilla extract. Beat the mixture well until it’s rich and glossy, creating a lovely fudgy base for your Christmas Tree Brownies.
Step 4: Incorporate Dry Ingredients
Sift the all-purpose flour, cocoa powder, and salt directly into the wet mixture. Gently fold the ingredients using a rubber spatula until just combined, taking care not to overmix. You want to maintain the airy texture while ensuring every ounce of chocolate goodness is incorporated into the batter.
Step 5: Bake the Brownies
Pour the luscious brownie batter into the prepared baking pan, spreading it evenly to reach the corners. Slide it into the preheated oven and bake for 20-25 minutes. You’ll know the brownies are ready when the edges pull away slightly from the pan and the center feels fudgy but not liquid.
Step 6: Cool and Cut the Brownies
Once baked, remove the brownies from the oven and allow them to cool in the pan for a few minutes before transfering them to a wire rack. Let them cool completely before cutting into square shapes. For cleaner cuts, refrigerate the brownies briefly; this helps achieve those neat, festive edges!
Step 7: Make the Chocolate Buttercream
In a separate bowl, beat the softened butter until creamy and fluffy. Gradually add in the powdered sugar, mixing until light and airy. Incorporate the cocoa powder, melted chocolate, vanilla extract, and enough milk or cream to reach your desired consistency. This smooth, rich buttercream will make the perfect topping for your Christmas Tree Brownies.
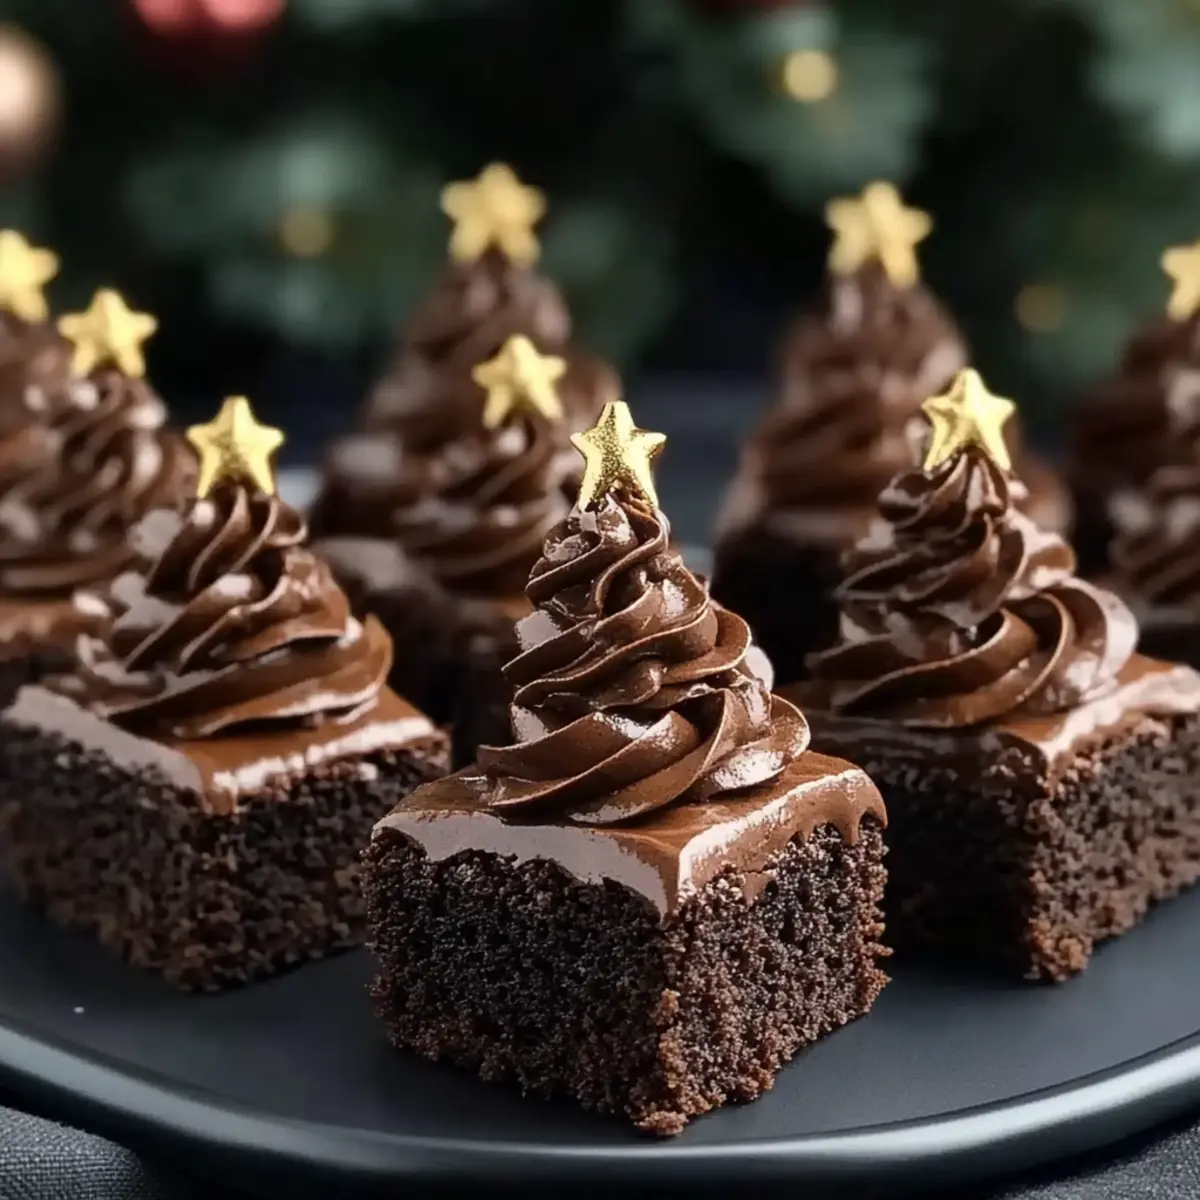
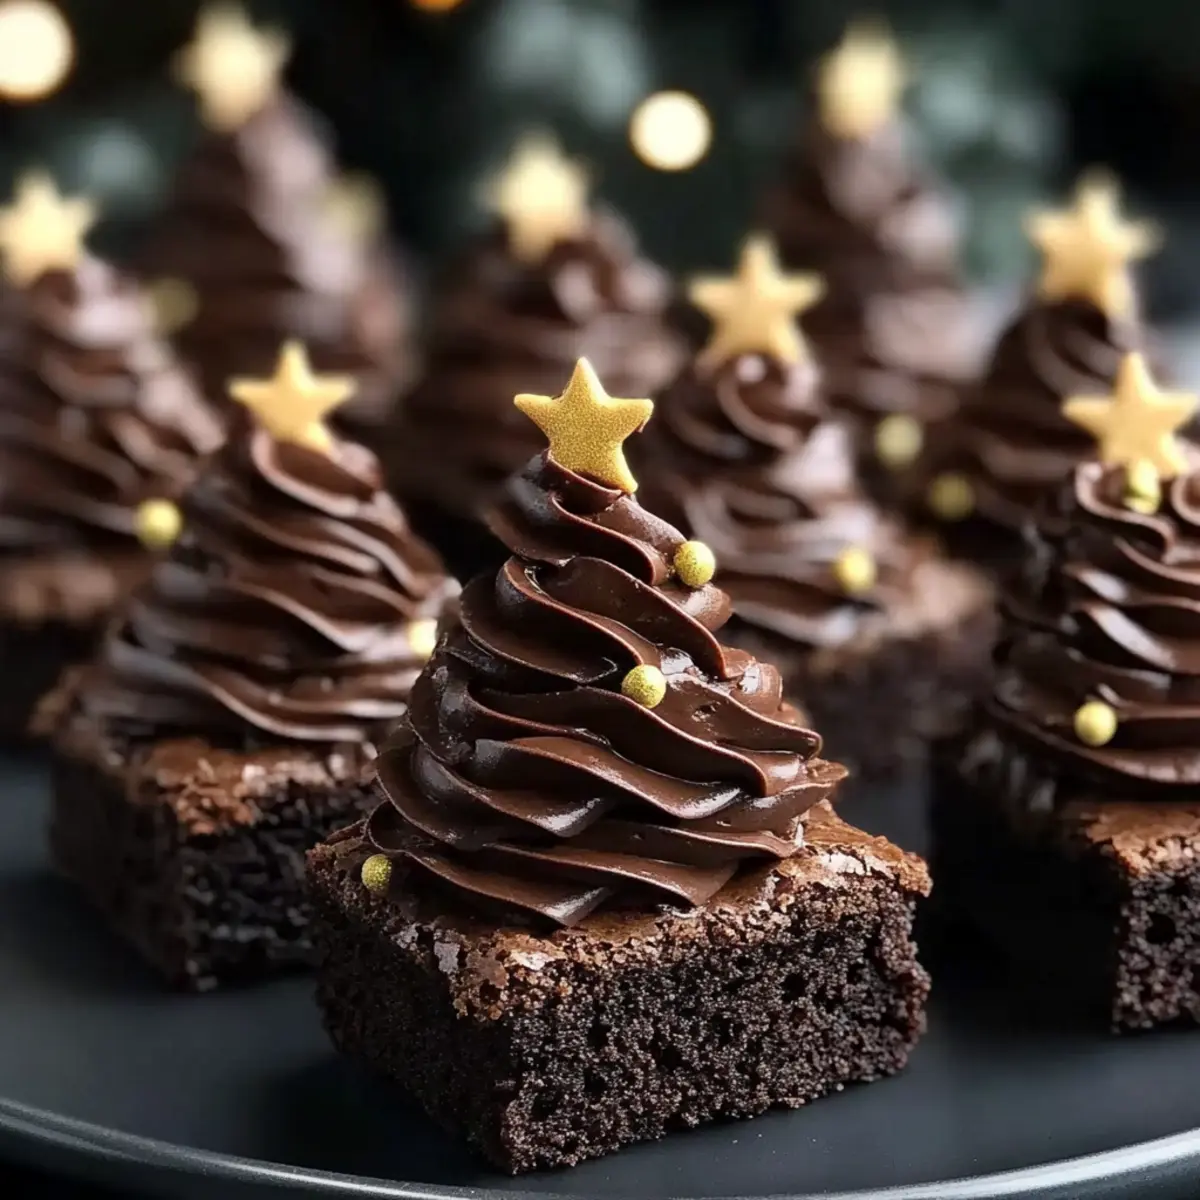
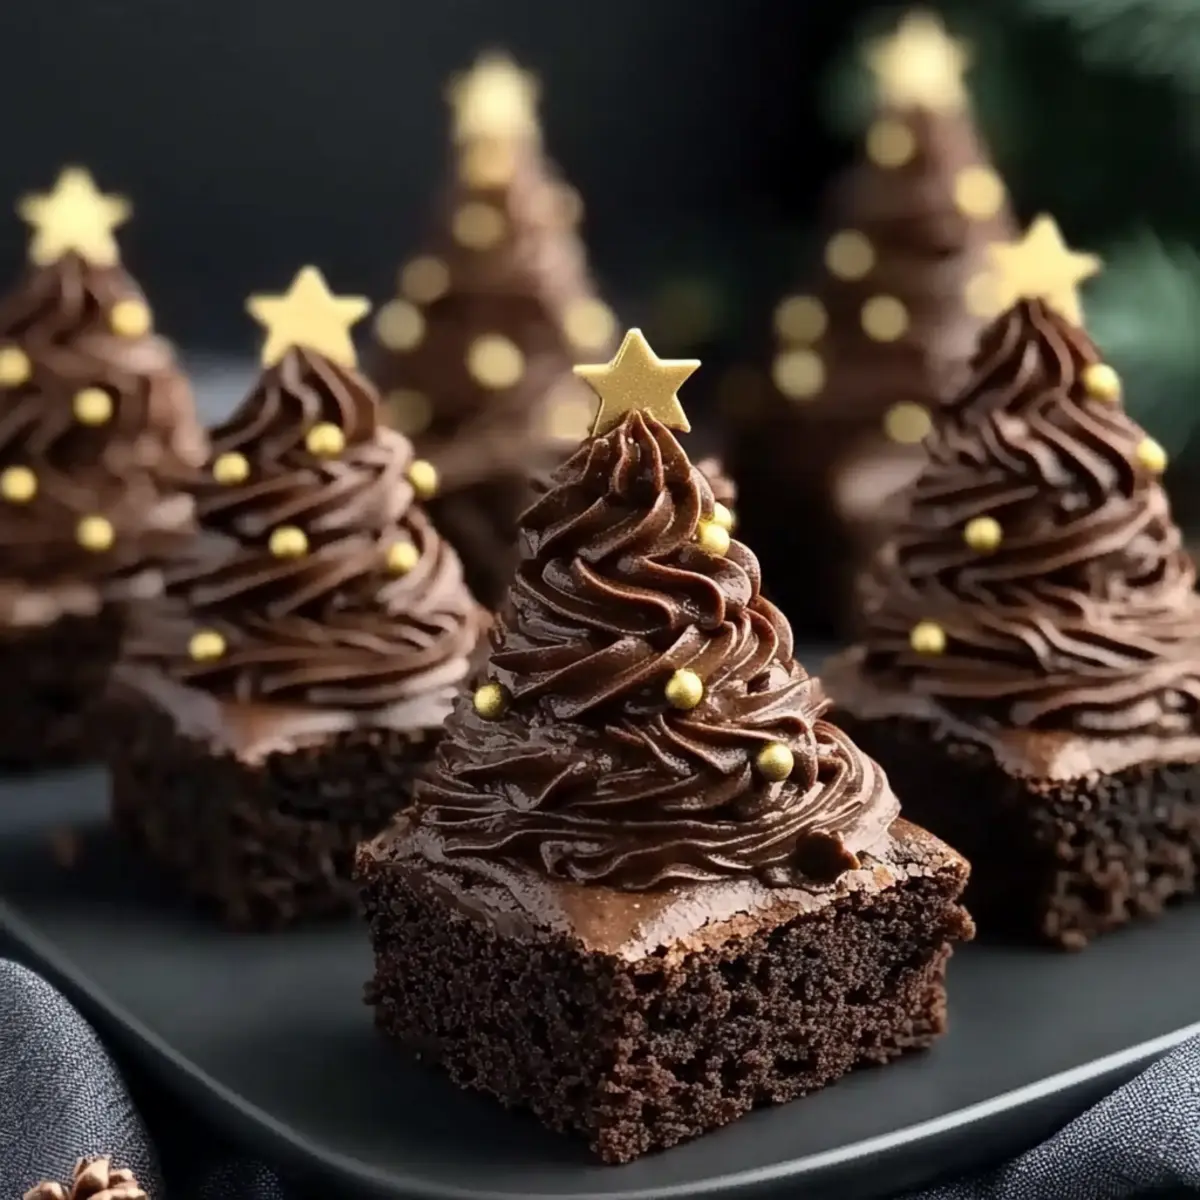
Step 8: Pipe Buttercream and Decorate
Once the brownies are cut and cooled, it’s time to pipe the chocolate buttercream. Use a piping bag fitted with a star tip to create Christmas tree shapes on top of each brownie square. Don’t forget to have fun with decorations—add edible gold pearls, sprinkles, or a festive star to complete your whimsical Christmas Tree Brownies!
Step 9: Serve and Share the Joy
Present your beautifully decorated Christmas Tree Brownies on a festive platter. They are perfect for sharing at holiday gatherings, gifting to friends, or simply enjoying at home with loved ones. Embrace the festive spirit with every rich, chocolatey bite!
Make Ahead Options
These Christmas Tree Brownies with Chocolate Buttercream are perfect for busy home cooks looking to save time during the holiday season! You can prepare the brownie batter and bake them up to 24 hours in advance, ensuring they remain just as fudgy and delicious. Store the cooled brownies in an airtight container at room temperature or refrigerate them to maintain freshness. The chocolate buttercream can also be made up to 3 days ahead; simply refrigerate it until you’re ready to pipe it on the brownies. When it’s time to serve, take the buttercream out for a bit to soften, then pipe it onto the brownies and add your festive decorations for a delightful holiday treat everyone will love!
What to Serve with Christmas Tree Brownies with Chocolate Buttercream?
Indulging in these whimsical treats is just the beginning—creating the perfect dessert spread will elevate your holiday gathering!
-
Rich Hot Cocoa: The warm, creamy flavors of hot cocoa create a cozy contrast to the fudgy brownies, enhancing their chocolatey essence.
-
Vanilla Ice Cream: A scoop of vanilla ice cream adds a delightful creaminess and coolness, perfect for balancing the richness of the brownies.
-
Homemade Eggnog: This classic holiday drink brings festive cheer and creamy sweetness that pairs beautifully with the chocolate flavors of the brownies.
-
Fresh Berries: Tart raspberries or strawberries offer a refreshing contrast, adding a burst of freshness that enhances every chocolate bite.
-
Coffee or Espresso: The boldness of coffee complements the chocolate brownies harmoniously, deepening the decadent flavor profile with each sip.
-
Peppermint Tea: A warm cup of peppermint tea provides a refreshing twist that cleanses the palate while celebrating the festive spirit.
-
Christmas Sugar Cookies: These delightful cookies add an element of crunch and sweetness, creating a playful mix of textures on your dessert table.
-
Spiced Nuts: A handful of spiced nuts adds a crunchy, salty element that perfectly balances the sweetness of the brownies.
-
Chocolate Mint Cheesecake Bars: For a true chocolate lover’s dessert spread, these bars provide a different chocolate experience without straying too far from the theme.
Christmas Tree Brownies with Chocolate Buttercream Variations
Feel free to unleash your creativity and personalize these delightful brownies with some tasty twists!
-
Sweet Swap: Change dark chocolate to semi-sweet or milk chocolate for a sweeter variation that children will adore. The fudginess remains while amplifying that delightful sugar rush!
-
Buttercream Advance: Make the chocolate buttercream a day ahead and store it in the fridge. This allows the flavors to meld beautifully, saving time on the big day while enhancing the overall taste.
-
Decorating Fun: Get playful with various edible decorations like crushed candy canes, colorful sprinkles, or festive sugar snowflakes. Each choice will add a unique crunch and color to your whimsical trees.
-
Gluten-Free Delight: Swap out all-purpose flour for a gluten-free blend to cater to dietary preferences, ensuring everyone can enjoy these festive treats without worry.
-
Flavor Boost: Consider adding a splash of peppermint extract to the brownie batter or buttercream for a refreshing holiday twist. It brings a festive zing that pairs beautifully with the chocolate!
-
Nutty Addition: Stir in some chopped nuts, such as walnuts or pecans, into the brownie batter for added texture and a nutty flavor contrast. It enriches the overall experience with each decadent bite.
-
Spice it Up: Add a pinch of cinnamon or nutmeg to the brownie mix for a warm, spicy undertone that captures the essence of holiday treats. It’s an unexpected yet delicious surprise!
For even more chocolatey goodness, check out my Chocolate Chip Cookie Dough Protein Balls or indulge in some Hot Chocolate Cookies. Happy baking!
Expert Tips for Christmas Tree Brownies
- Cool Completely: Allow brownies to cool fully before cutting; refrigerating them briefly helps achieve cleaner, neater edges when slicing.
- Sharp Knife: Use a sharp knife to cut brownies and clean it between each cut for perfectly shaped squares that look fantastic when decorated.
- Fudgy Refresh: To revive brownies after storing, microwave them for a few seconds to restore their fudgy texture without melting the chocolate buttercream.
- Decoration Variations: Get creative with toppings; crushed candy canes or festive edible glitter can add texture and excitement to your Christmas Tree Brownies.
- Proper Storage: Keep brownies in an airtight container at room temperature for up to 2 days, or refrigerate to extend freshness; unfrosted brownies can be frozen for later enjoyment.
How to Store and Freeze Christmas Tree Brownies
- Room Temperature: Keep brownies in an airtight container at room temperature for up to 2 days to maintain their freshness and fudgy texture.
- Fridge: If you need to extend their shelf life, refrigerate the brownies for up to a week. Be sure to store them in an airtight container to prevent drying out.
- Freezer: For longer storage, unfrosted brownies can be frozen for up to 3 months. Wrap them tightly in plastic wrap, then place in a freezer-safe bag to prevent freezer burn.
- Reheating: To revive the fudgy texture, microwave individual brownies for a few seconds before serving. Enjoy them warm for an indulgent treat!
Christmas Tree Brownies with Chocolate Buttercream Recipe FAQs
What chocolate should I use for the brownies?
Absolutely! I recommend using dark chocolate for a rich and deep flavor, but semi-sweet or milk chocolate can be swapped in if you prefer a sweeter taste. If you go for dark chocolate, aim for a high-quality brand with at least 60% cocoa content for the best results.
How should I store my Christmas Tree Brownies?
You can keep your brownies in an airtight container at room temperature for up to 2 days. If you’re looking to enjoy them longer, refrigerate them in the same airtight container for up to a week. Just ensure they’re well-sealed to prevent them from drying out!
Can I freeze the brownies?
Yes, you can absolutely freeze unfrosted brownies! Wrap them tightly in plastic wrap and place them in a freezer-safe bag. They can last for up to 3 months in the freezer. When you’re ready to enjoy them, simply thaw in the fridge overnight and then microwave briefly to restore their fudgy texture!
What if my brownies come out dry?
If your brownies turn out dry, it could be a sign that they were overbaked. To prevent this, make sure to check for doneness at the lower end of the baking time (20 minutes). The edges should pull away from the pan slightly while the center remains set but soft. If you find them dry after baking, top them with extra chocolate buttercream to add moisture and flavor!
Are these brownies suitable for those with gluten allergies?
Very! You can make these Christmas Tree Brownies gluten-free by substituting the all-purpose flour with a gluten-free blend. There are many great options available that perform just like regular flour, ensuring your brownies maintain their deliciously fudgy texture. Always check that other ingredients, like chocolate and baking powder, are gluten-free as well.
Can I make the buttercream in advance?
Absolutely! Making the buttercream a day in advance is a brilliant idea. Simply store it in the refrigerator in an airtight container. When you’re ready to use it, let it sit at room temperature to soften, then give it a quick whip before piping onto your brownies. Enjoy the extra time you gain by being well-prepared!
Delicious Christmas Tree Brownies with Chocolate Buttercream
Ingredients
Equipment
Method
- Preheat your oven to 175°C (350°F) and line a square baking pan with parchment paper.
- In a medium bowl, melt dark chocolate and butter in the microwave until smooth.
- Allow the mixture to cool slightly, then whisk in the granulated sugar. Add eggs one at a time and beat in vanilla extract.
- Sift flour, cocoa powder, and salt into the wet mixture and fold gently until combined.
- Pour the brownie batter into the prepared pan and bake for 20-25 minutes or until edges pull away slightly.
- Allow brownies to cool in the pan for a few minutes before transferring to a wire rack to cool completely.
- Beat softened butter until creamy, then gradually add powdered sugar, cocoa powder, and milk to make the buttercream.
- Pipe the chocolate buttercream over the cooled brownies, creating Christmas tree shapes.
- Decorate with edible decorations and serve on a festive platter.
Leave a Reply